28 February 2007

Reality Bites


Paris, Britney, Anna Nicole. I’ll admit it, most of the time those first-name celebrities come up, I have no idea what people are talking about. Lindsay who? They did what? My pop-culture knowledge is as vapid as an US Weekly book review. I haven’t owned a television for four years and my mother knew about YouTube before I did. If it weren’t for some friends to keep me in check, my conversations would be relegated largely to 18th century Baghdad architecture, Richard Ford novels, and whatever makes it to NPR. But this is not a good thing either, for I have no desire to fall the way of pedantic snobbery and it can be terribly awkward when making small talk at parties or with cab drivers. Rather, I’m trying to balance the esoteric with that of popular appeal, to meet Arvo Part with JT, Grisham with Josephine Tey.

So when, on a snowy weekend visiting my mother, she suggested an Oscar party, I readily agreed in a spirit of mass-media indulgence. Besides, I’d seen Wolfgang Puck’s fancy-schmancy recipes that he serves for the Oscar dinner, and figured I could try one of those. My mom suggested a pizza, complemented with a tale of how, in the fifties, she and her high school friend used to buy a pizza kit that came with packages of yeast, flour, tomato sauce and cheese and make it on Friday nights. Small town life.
DSCN7933DSCN7932

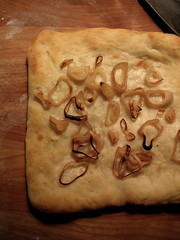
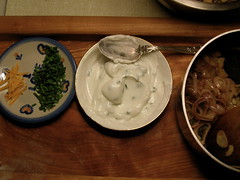
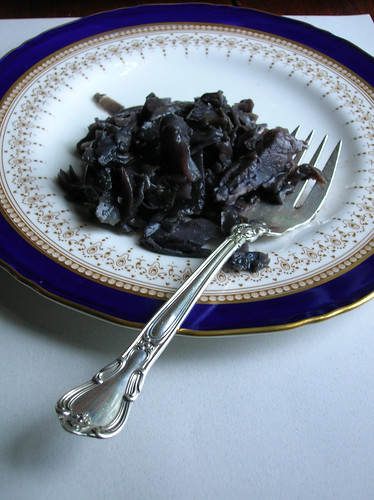
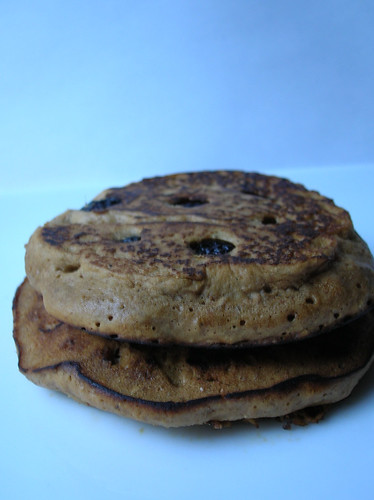
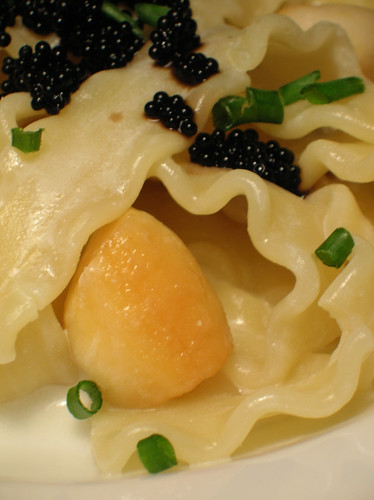
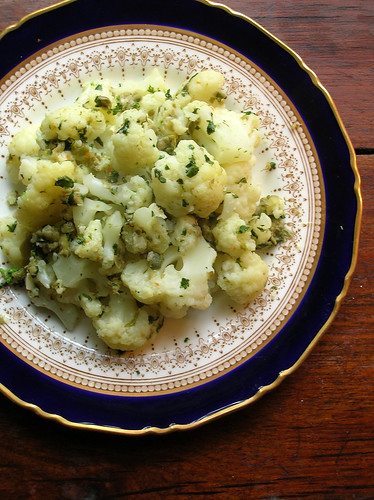
Our pizza was topped with sour cream and smoked salmon, which I realize is not quite the culinary kin of a Krispy Kreme doughnut or anything of low-brow inspiration. In retrospect, the recipe is more of an appetizer thing but we thoroughly enjoyed it as a main course in nice thick wedges. It was a great reminder of how easy homemade pizza dough is, and luckily we have some more which I rolled out and put in the freezer for a ready-in-8-minutes dinner. One of the best parts was the cauliflower salad I’ve been meaning to share here for a while now, nicely green with parsley and salty with olives and capers.

We even filled out Oscar ballots ourselves, and in some fluke, I actually won despite not having seen most of the films, so maybe there’s some hope for me after all.
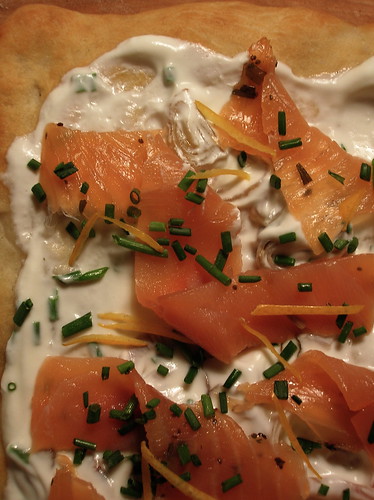
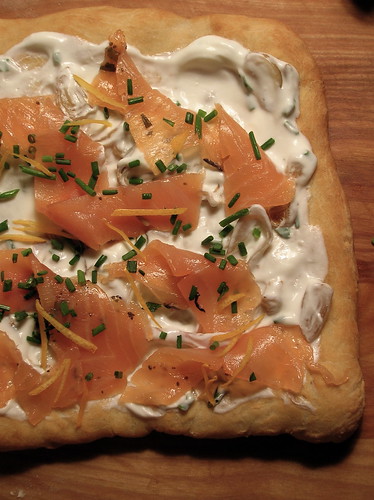
DSCN7936
Smoked Salmon Pizza
- for the pizza dough:
1 pkg yeast
1 cup warm water (~110 F)
1 tsp sugar
1 tsp salt
3 cups flour
2 tbl olive oil
- for the topping:
olive oil
1 red onion or 2 medium shallots, halved and thinly sliced
1 cup sour cream
2 tsp minced dill
1 tsp lemon juice plus lemon zest for serving
8 oz smoked salmon
chopped chives

1. In a small bowl, combine the yeast, sugar, and 1/4 cup of the warm water. Let sit until foamy, meanwhile, combine the flour and salt in a medium bowl. Add the yeast mixture to the flour along with the rest of the water and the olive oil. Stir with a wooden spoon or in a mixer with a dough hook for several minutes until the dough comes together.
2. Turn the dough out onto a lightly floured work surface and knead using the heel of your hand about ten times, or until the dough is smooth and elastic. Lightly rub a bowl with some oilve oil and put the dough in it, turning to coat. Cover the bowl with a towel and leave in a warm place to rise for 30 minutes.
3. Preheat the oven to 500 F. If you have a pizza peel, place in the oven to preheat, otherwise you can use a greased heavy-duty baking sheet. Divide the dough into four portions. Gently stretch each dough piece into a small pizza, either pressing it out with your fingers or with a rolling pin. Lightly brush the dough with some olive oil and sprinkle the onion slices over top. Place the dough onto the prepared baking sheet or peel and bake for 8 minutes, or until risen and golden.
4. While the pizzas are baking, stir together the sour cream, lemon juice, and dill. When the pizzas come out of the oven, let them cool a couple minutes, then spread with some of the sour cream mixture. Arrange some of the smoked salmon decoratively overtop, and sprinkle with chives and lemon zest. Cut pizzas into wedges or squares and serve.

DSCN7383
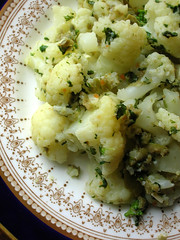
Cauliflower Salad with Caper Dressing

1 head cauliflower
2 tbl capers
1 handful flatleaf parsley, minced
4-5 green olives, chopped
pinch red pepper
olive oil

Place the capers, parsley, olives and red pepper in a mortar and pestle. I usually put a bit of the brine from the capers in there too. Pound the mixture with the pestle until well combined, if it seems a bit dry you can add a bit of olive oil. This can also be done in a food processor, but the mortar and pestle yields a better texture.
Seperate the cauliflower into florets and cook in boiling water until tender. Drain the
cauliflower and toss with the caper dressing, stirring to coat.

You could also add some little chopped up cornichons or hard-boiled egg to this.

23 February 2007

On Eating Cabbage Alone

I like to be alone when eating cabbage. Not because eating cabbage is shameful or embarrassing or messy, but because that is all I want. A big bowl of braised red cabbage, all for me.

Mr. Cabbage, I will thinly slice you and saute you with some apple and bacon. A hint of vinegar and maple syrup will add just the right sweet and sour notes as you begin to soften. I will cover you and slip you into the oven, like a child blanketed to bed, and leave you for an hour or so. When I return, I will find you miraculously melted into something transcendant- silky, smooth, tender. And I will have you all to myself, in a big bowl with only perhaps a hunk of good bread on the side. No one to ask me where th protein is, or quibble about so called 'main courses' and 'proper balanced meals.' Just you and me, with a fork in one hand and hopefully a good book in the other.


And in case I haven't quite had my fill of you, you will be just as good, if not better, the next day, cold, straight from the fridge. By then, your dark ruby hue will have turned almost black in the chill, eliciting contempt from any passers-by or finicky small children. But pay them no mind, for I know the sweetness you hide, and I will keep you a closely guarded secret, snatched in snippets by the cool door of the open refrigerator.


Braised Red Cabbage with Apple and Maple Syrup
This is a winter staple in our house, for everyday eaing I make it without the bacon, but it's also a regular on our holiday table, where the bacon shows up for the occaision. If you're short on oven space, you can do the braise on the stove top over very low heat. Adapted from Molly Stevens.

2 slices thick-cut bacon, cut into 1/2-inch-wide strips
1 medium red onion, thinly sliced
Coarse salt and freshly ground black pepper
1 Granny Smith apple, peeled, cored, and thinly sliced
1 teaspoon grated fresh ginger (optional)
1 large head red cabbage (a scant 2 pounds), quartered, cored, and thinly sliced
1/4 cup cider vinegar
2 tablespoons pure maple syrup

1. Preheat the oven to 325 degrees.
2. Add the bacon to a large deep ovenproof skillet (12- to 13-inch) over medium heat, and fry the bacon until it renders its fat and begins to crisp, 5 minutes. Scoop out the bacon with a slotted spoon and set aside on paper towels to drain.
3. Keep the the bacon fat in the pan and stir in the sliced onion. Season with salt and pepper and sauté, stirring a few times, until the onion turns limp, about 2 minutes. Add the apple and ginger and stir to combine. (If the pan gets dry add a bit of butter,lard or shmaltz to it) Increase the heat to medium-high and begin adding the cabbage a few handfuls at a time. Once all the cabbage is in the skillet, sauté, stirring frequently, until the strands begin to wilt and have a moist gleam, about 6 minutes. Add the vinegar and syrup, and return the bacon to the pan. Stir to incorporate, and let the liquid come to a boil.
4. Cover the pan and slide into the middle of the oven. Braise at a gentle simmer, stirring every 20 minutes, until the cabbage is tender and deeply fragrant, about 1 hour. Serve warm or at room temperature.

21 February 2007

Of Lemons and Laziness


To many home cooks, preparing Middle Eastern dishes can seem awfully labor intensive. There's the long-cooking of beans, the soaking of grains, the straining of yogurt, not to mention the endless chopping of parsley. And there are cookbook authors like Paula Wolfert leaning over your shoulder telling you you absolutely must do these things, you must use the proper clay pot or steam your couscous just like this. Certainly, all these things make a difference, but I am here to tell you that very few Arab women do any of this themselves. They pay other people to do it. On almost every corner, fresh cooked chickpeas and foul (large fava beans) are available, artichokes in the market are trimmed for you, bags of freshly chopped herbs and peeled garlic cloves line the stalls. As a Syrian friend of mine said with a laugh, "we love good food, but we are also a lazy people." I would point out that Arab women still put a lot of energy into their cooking, chopping miles of parsley for tabboule and squeezing bushels of lemons, but they naturally use some conveniences.

Preserved lemons are one of those products readily available alongside pickles and relishes, and they are a wonderful addition to anything from salad to a roast chicken. Luckily, even if they aren't readily available where you live, they are very easy to make, I mean, what could be lazier than packing them away and forgetting them for 3 weeks? After that, just pull one out when you want it and you're good to go. This little green olive salad is available ready-made at most cheese shops in Damascus, but it's just as easy to make yourself. It can be served as an appetizer, part of a mezze spread, or on it's with some bread or as filling for a sandwich. I've made it the traditional way, but I think it would be just as good finely chopped as more of a relish or spread.


Green Olive, Carrot, and Preserved Lemon Salad

3 tbl olive oil
1/2 tbl cumin
1/2 tbl paprika or aleppo pepper
1 tsp salt
1 cup carrots, diced
2 cups green olives
1 cup preserved lemons, chopped (see below)

Heat the olive oil in a skillet. Add the spices and stir so that they infuse the oil and become fragrant. Add the carrots and cook, stirring, until the carrots are just softened, but still maintain their shape and do not brown. Remove the pan from the heat and stir in the olives and preserved lemons. Keep in the refrigerator, this keeps well and is even better after a few days.
You can also chop up the salad to make a green-olive relish that's great as a dip or spread.

Preserved Lemons

lemons, as many as you want and will fit compactly into your jar
kosher salt
extra lemon juice, if necessary

1. Trim the tips of the lemons. One by one, cut the lemons as if you were going to cut them in half lengthwize, starting from the tip, but do not cut all the way. Keep the lemon attached at the base. Make another cut in a similar manner, so now the lemon is quartered, but again, attached at the base.
2. Pry the lemons open and generously sprinkle salt all over the insides and outsides of the lemons.
3. Sprinkle some salt in the bottom of a canning jar. Pack the lemons in the jar, squishing them down so that juice is extracted and covers the lemons . Fill up the jar with lemons, make sure the top is covered with lemon juice. Add more fresh squeezed lemon juice if necessary. Top with a couple tablespoons of salt.
4. Close the jar tightly and let sit at room temperature for a few days, turning the jar upside down every once in a while. Transfer to the refrigerator and let sit for 3 weeks, until the lemon rinds soften.
5. To use the lemons, remove one from the jar and rinse off any salt. Remove and discard the pulp and seeds. Lemons can keep for 6 months to 1 year in the refrigerator.

20 February 2007

The Address of a Pancake

gingerbread-blueberry pancakes 1
It's funny how cravings work, the sudden inexplicable desire for a certain food. That 3 a.m. pickle, or an afternoon nibble of chocolate. When living in the Middle East, the food is so good, I rarely miss anything from home. However, when I was living in Beirut several years ago, my roomates heard about a place that served waffles at weekend brunch. Immediately, we knew we had to go. When it comes to brunch, I am a waffles girl, their crunchy extreior and light interior, the perfect craddles for syrup. In contrast, pancakes are often monotone, heavy, and disappointing. The following weekend, after a long Beirut night, we set out in search of the waffle place.

Like most cities in the region, Beirut doesn't really have addresses in a functional sense. Basically, many streets have multiple names (an official name and a local nickname), and the numbers tend to run in no particular order. Add to this the tiny narrow streets, the constant changing of political leadership (who want to rename the streets in their honor), and local residents tendency to hang any number that strikes their fancy on the outside of their building, and you get the idea. If you need directions, use landmarks, if you want mail, get a P.O. box. That morning we wandered the lanes off Sharia Hamra, past 12, 34, 5, 36, in search of waffles.


When we asked local residents about a place that served waffles, they looked at us strangely, it's a Western breakfast food, we explained. Here, we encountered another problem, that is people's tendency to tell you they know where something is, even if they don't. "Ah yes, it's just down the road," or, "it's back there on the left." We trudged from one restaurant to another, inquiring. "Yes, wonderful breakfast food here," said one, "yes, crepes, pancakes," said another, but further questioning revealed no waffles. It was past noon and we were dripping sweat in the summer sun and irritable with hunger.

In the end we never found the waffle place, and I spent the following months with a lingering desire for waffles, no doubt fostered by my inability to attain them. When I was getting ready to move to Damascus, I seriously considered packing a waffle iron, but it seemed a little excessive, not to mention heavy, in my limited suitcase space. Instead, I managed to come across a pancake recipe that satisfies a weekend morning indulgence, nutty and warm with gingerbread spices. Blueberry gingerbread pancakes are just the right warming thing for a cold rainy morning. Waffles were always fare for Sunday mornings, but Sunday in Damascus is a workday, so now we have these Saturday morning pancakes instead.

It's traditional to eat pancakes today, Fat Tuesday, as a way to use up eggs/butter/milk before Lent, but I've included my classic waffle recipe below if you prefer.

gingerbread-blueberry pancakes 2

Blueberry Gingerbread Pancakes
I keep oat bran (the hot cereal kind, not unprocessed bran flakes) in my pantry, and I like the texture it adds to the pancakes, I imagine ground oats or whole wheat flour would have a similar effect.

1 1/2 cups flour
1/2 cup oat bran
1 tsp baking powder
1/2 tsp baking soda
1/4 cup brown sugar
1/2 tsp each ginger, cinnamon, and nutmeg
1 egg
1 cup buttermilk
1/2 cup molasses
2 tbl melted butter or vegetable oil
1 cup blueberries

In a large bowl, whisk together the dry ingredients. In a small bowl, beat together the liquid ingredients. Stir the wet ingredients into the dry ingredients with a few swift strokes, fold in the blueberries. Heat a griddle or skillet with a little bit of oil or butter. Drop batter by ladle-fulls onto the griddle, when bubbles form on the surface of the pancake, flip the pancake and cook until nicely browned on the 2nd side. Continue with the remaining batter, keeping the pancakes warm in a low oven, if desired. Serve with butter and maple syrup.

Sunday Morning Waffles
This great recipe stands up to all sorts of alterations and substitutions and can be doubled or even tripled, and it still produces light crispy waffles. If you have leftover waffles, as I always do, wrap them up and freeze them, then pop them out and reheat in the oven or toaster.

1 cup all-purpose flour
2 tbl cornstarch
1/2 teaspoon salt
1/2 teaspoon baking powder
1/4 teaspoon baking soda
1 cup buttermilk
3 tbl vegetable oil or melted butter
1 large egg, separated
1 tablespoon sugar
1/2 teaspoon pure vanilla extract
maple syrup, for serving

1. In a medium bowl, combine the flour, cornstarch, salt, baking powder and baking soda. In a glass measuring cup, blend the buttermilk and vegetable oil. Beat in the egg yolk.

2. In a medium bowl, beat the egg white to soft peaks. Add the sugar and beat until firm and glossy. Beat in the vanilla.
Pour the liquid ingredients into the dry ingredients and whisk until just blended. Using a rubber spatula, gently fold in the beaten egg white until just incorporated.

3. Preheat a waffle iron and oil it lightly. Pour a ladle-full of the waffle batter into the preheated waffle iron and gently smooth the surface with a spatula. Bake for 4 minutes, or until the steam stops coming out of the iron and the waffle is browned and crisp. If necessary, keep waffles warm in a 200 degree oven. Serve with maple syrup.

18 February 2007

To Market, To Market


The best thing about my old neighborhood in Damascus, Muhajereen, is the sprawling market tucked up into the slope of the mountain-side. Muhajereen is a middle class conservative neighborhood whose northern location offers sprawling city views; for me, I was drawn by the affordable rent on good-quality appartments and proximity to my office. But I was soon to discover that the best thing about Muhajereen is the souq al-jumoaa, or the market. At the end of al-Afif Street, where the road climbs up the mountain past an eighteenth century mosque and a little lane trundles past some occupied Ottoman-era buildings, is the market’s entrance.


Summer figs, peaches, and unusual fruits.

In Arabic, when someone says they’re going to the market (souq), it could mean anything from going around the corner for some milk to a full afternoon of clothes shopping in the hippest area. Similarly, the market sells just about anything, though it’s primary trade is in fruits, vegetables, meats, cheeses, and breads. Muhajereen’s souq al-jumoaa is particularly expansive, running the equivalent of about 10 blocks packed with vendors in winding streets. A small square halfway through the market fronts onto a mosque which holds the tomb of a famous Sufi leader. In the mornings, clusters of women walk through in their long black robes. The women wear a full black cloth over their faces so that no features are distinguishable, most wear black gloves. Occaisionally, they lean over to inspect the quality of some tender lettuces or a new blender, deftly flipping up and then lowering their veil in a single motion for a clearer view. All the vendors are men.


Making pancakes for qatayaf, romaine lettuce.

On Friday mornings my favorite thing to do is to stroll the market, when it bustles in the morning light. I am the only foreigner but no-one pays to much attention. I visit the cheese man with the saltiest, creamiest feta and the little balls of shankleesh. At the baker, I get the little crunchy yellow cookies with anise seeds in them. I side-step the blood that runs near the area of the meat-market where full carcasses are strung up in the open air. There is always a surprise in the form of an unusual vegetable I’ve never seen, or some tiny berries that will only be available that week.

A Middle Eastern market is not a place to be squeemish about meat.

Whenever I had visitors, I always took them to my local market. In part, the excitement of the market is representative of how little else there is to do here, movies, sports, and theater exist but are primarily fodder for the upper classes. However, the market is also symbolic of a society that revolves around sharing a daily meal with your family, the joys of preparing and eating food together, of living by the season and discovering the daily bounty of nature.


Tomato and Shankleesh Salad
Shankleesh (شنكليش) is a Middle Eastern cheese (also known as sorke) which is shaped into round balls and rolled in either red pepper or zaatar. As the cheese ages it acquires a crumbly texture and pungent flavor. A salad of chopped tomatoes, onion, and shankleesh is a standard addition to any mezze table and often accompanied by arak (an anise-scented liquor).

2-3 balls shankleesh, depending on their size
3 ripe tomatoes, chopped
2 tbl diced onion
pinch of salt

Mix all ingredients, crumbling the cheese with your fingers. Serve immediately with pita bread and arak.

Unfotunately, shankleesh is generally unavailable outside the Middle East, for a discussion on how to make it, see here. There's no real substitute for shankleesh, but I find a mixture of half goat cheese and half blue cheese along with a generous pinch of Aleppo pepper is a good alternative. I use about 3 oz of each cheese, usually chevre or fresh crottin for the goat cheese, and a tangy blue cheese like Bleu d'Auvergne, Roquefort, or Maytag blue.

16 February 2007

At least there were peanuts.


Arriving home after surviving 4 days of airport perdition (and the airline is still equivocating on reimbursement, bah!), I was in need of a solid home cooked meal. Something easy and comforting. Since my short trip had turned into almost seven days, I had some nasty surprises waiting in the refrigerator: soured milk and moldy ricotta cheese. After a quick cleaning of the fridge, I was left with some pretty bare shelves, and venturing out into the snowy, slushy streets seemed too much to bear.

Luckily, I remembered a recipe I had clipped a while ago for tomato-peanut butter soup. One of those things made with pantry staples that I always mean to make but never get around to. A can of tomatoes, a scoop of peanut butter, a pinch of good curry powder, and a short simmer later and my spirits were beginning to be revived. As I spooned the nice thick soup into my bowl, I remembered the packet of peanuts from the plane which I had stuck in my bag. Sprinkled on top, the crunch of the peanuts pulled the soup together perfectly, though don't expect me to go thanking the airlines any time soon.


Tomato-Peanut Soup
If you are a peanut butter fiend like myself, I recommend you increase the peanut butter to your liking.

1 tbl peanut oil
1 onion, chopped
2 garlic cloves, minced
2 tsp minced ginger
1 tsp each cumin, coriander, and curry powder
1 (14 oz) can stewed tomatoes
2 carrots, chopped into small pieces
2 cups hot water or stock
1/3 cup peanut butter
peanuts, for serving

In a medium pot, saute the onion, garlic, and ginger in the peanut oil. Stir in the spices and cook until the onion is softened. Add the tomatoes, carrots, and 1 cup of the water or stock. Simmer the mixture over low heat about 15 minutes. In a small bowl, combine the remaining cup of hot water/stock with the peanut butter and stir until smooth, then add the mixture to the pot. Simmer another 5 minutes to combine. Puree the soup until it is thickened but still has some chunks in it. Serve sprinkled with a good handful of peanuts.

15 February 2007

Tarmac Sweethearts


I wish I could explain the recent absence from posting here with something fun or exciting, a trip to Bali, maybe, or being busy with an exciting project. That would be nice, right? Ahh, but no, the reason for my absence is none of these, nor is it apathy on my part. No, I have spent the past three days (three days!) in an airport. Anticipating a nice long weekend, I didn't even pack my laptop, hoping to get away from work for a while. What I didn't anticipate was a near-blizzard that socked the midwest, leaving me sitting on a plane on a frozen tarmac for hours, and hours more in the airport. The next day was much of the same and when the storm finally cleared it hit New York, my destination, leaving more delays which lead to cancellations and my desire to throttle about every airline employee in sight. By the third day, my fellow passengers became comrades as we returned each day, battle weary and ready to tackle boredom by reading every newspaper and magazine available and subsist on tomato juice, pretzels, and some well-timed trips to the bar. My long weekend turned into 6 days, including one very grumpy February 14.

And to think, I even had a special recipe saved for you, reader, for Valentine's day. Not that I particularly like Valentine's Day, which seems manufactured for boxes of atrocious chocolates and the greeting card industry. However, back when I had a bounty of scallops a little while ago, I came up with a recipe so luscious it just seemed perfect for a romantic dinner. Long noodles are bathed in a tangy cream sauce (something about long noodles are very sexy, like in "Lady and the Tramp"). I find caviar to be an acquired taste, but it really works here, adding a bright pop and tang to the rich sauce and scallops. I imagine crab meat would work nicely here as well, and thin little angel hair pasta could be substituted for the thick ruffly mafalda noodles I used. No matter what, it's certainly a special occasion dish, and the sort of luxury to share with someone you love (provided, of course, you aren't stuck in the airport).


Caviar and Seared Scallop Pappardelle
The luxury of caviar combined with langorously long noodles make this an undeniably special dish. The tangy cream sauce balances the caviar, and there are many domestic brands of roe that have reasonable prices. Because of the natural saltiness of caviar, this dish does not call for any additional salt.

1/2 lb pappardelle or mafalda pasta (or enough for 2 good servings)
1 tbl butter
1/2 lb bay scallops
1/4 cup white wine
3/4 cup heavy cream
1/4 cup parmesan cheese, grated
1 tsp lemon juice
2 heaping tablespoons caviar
chopped chives for serving

1. Cook the pasta in boiling water until al dente, about 8-12 minutes.
2. While the pasta is cooking, melt the butter in a large skillet. Add the scallops and toss them over high heat so that they are nicely seared on both sides and plump, 3-4 minutes. Remove the scallops to a plate. Lower the heat in the pan and add the wine to deglaze, scraping the bottom of the pan. Add the cream, lemon, and the parmesan and stir to combine.
3. When the pasta is done, use tongs to remove the pasta from the pot and transfer it to the pan with the sauce, reserve the pasta cooking water. Add about a half cup of the pasta water to the pan and cook over low heat, stirring and using more pasta water to adjust the consistency if necessary. Add the scallops to the pan and stir to combine. Transfer the pasta to two serving bowls and top with a spoonful of caviar and some chopped chives.

Serves 2.

08 February 2007

Vanilla-Poached Pears with Chocolate Sauce


Maybe it was those green beans the other day, but suddenly I am feeling French. Not French as in butter and cream sauces, but rather those simple elegant dishes of little country cottages, of chickens stewed in white wine and yogurt cakes. So it makes sense that when confronted with pears which refused to ripen and despite their cozy brown bag remained unpleasantly firm, I thought of poached pears. Not those lusciously blushed pears in red wine, but in a vanilla syrup. The preparation is simple, requiring just a vanilla bean to perfume your kitchen with its warmth. Of course, vanilla’s classic partner is chocolate, in the form of a syrup drizzled nicely over top. This simple syrup is like the Hershey’s you grew up with, only about one thousand times better. It comes together just as quickly as the pears, and already has me dreaming of profiteroles or just a bowl of vanilla ice cream.

Seeing how that big red holiday is encroaching upon us, I think the poached pears would be a lovely finale for a romantic dinner. You could even tuck a little warm chocolate ganache inside the pear as a surprise. Elegant, but also a light end to the meal, so that there’s still room for more, if you get my drift.


Vanilla Poached Pears
Serve the pears drizzled with the following chocolate sauce. You could also sit the pears atop a nice bit of creme fraiche or creme anglaise.

2 cups water
1 cup sugar
1 vanilla bean, slit lengthwise, or 1 teaspoon vanilla extract
4 firm pears

1. In a large skillet or saucepan, bring the water and sugar to a boil over high heat, stirring to dissolve sugar. Boil 2 minutes then add the vanilla bean. Keep the syrup simmering.
2. Peel the pears and, working from the bottom, remove the cores.
3. Using tongs, dip each pear in boiling syrup to coat and prevent darkening. Turn pear on its side in the syrup and repeat with remaining pears.
4. After all the pears have been added, test the first one for doneness by piercing it with the tip of a knife. If tender, remove with tongs, place pears in a serving dish.
5. Raise the heat under the skillet to high and cook the syrup until it is reduced by half, about 15 minutes. Pour syrup around pears in the serving dish, cover loosely and refrigerate until ready to serve. Serve cool or at room temperature with chocolate sauce.

The Best Chocolate Sauce
From David Lebovitz. Makes about 2 1/2 cups.

1 cup water
1/2 cup sugar
1/2 cup corn syrup (glucose)
3/4 cup unsweetened cocoa powder (preferably Dutch-processed)
2 ounces bittersweet or semisweet chocolate, finely chopped

1. In a medium saucepan, whisk together the water, sugar, corn syrup, and cocoa powder. Bring to a boil over medium heat. Once it's just begun to simmer and boil, remove from heat and stir in the chopped chocolate until melted.

That's all! You can let the chocolate sauce stand for a few hours before serving, which will give it time to thicken a bit. Store the chocolate sauce in a covered container in the refrigerator for up to 10 days. Rewarm before serving.

07 February 2007

Impulse Buyer


Call me methodical. I love routine, the repetition of getting up, fixing breakfast, passing the same strangers on my way to work every morning. I’m secretly curious other people’s routines too, like do you get dressed before or after having breakfast? do you read before going to bed? Those little details can reveal so much about a person. Concurrently, I also like planning things, and making lists, though neither of those seem to have high rates of accomplishment these days.

Therefore, when it comes to grocery shopping, I’m equally methodical. First, there’s the taking into account what’s already in the cupboards, then the perusing of recipes for inspiration. I keep a little note pad with me where I scribble down ideas in the form of grocery lists. Sitting on the bus, I contemplate potato curry verses potato gratin, drawing up alternate lists. My bag is littered with embarassing scraps of paper containing notes like “rutabagas or turnips?” and “use up the tomatoes” (while there could be worse things lurking in there, this is by no means the glamour of a Chanel compact). By the time I arrive at the market, my fate is pretty much sealed, my mission determined. I get what I need, I do not succomb to the candies by the register. I am not an impulse buyer.

Except for the other day, when I was not only an impulse buyer, but an 8 am impulse buyer. Walking down the hill that morning, I spied at the corner grocer’s a large box of the most skinny elegant green beans I ever did see. “Loubia fransawiyya,” read the sign. Right then and there, disregarding my usual lateness for work, I decided I had to have them. Like a socialite to the latest Manolos, so am I to little green beans. Slipping into the office a short while later, I tucked my half kilo of beans into the back of the fridge.

That evening I knew only one recipe would do for my beans, one that my mother made often when I was growing up and one I haven’t had in as many years, green beans almondine. Speaking of shoes, this dish is like the stiletto of the vegetable family: skinny, seductive. Cooked green beans tossed in a nutty-almondy butter sauce, it was simplicity at its best. And proof that being impulsive pays off sometimes.


Green Beans Almondine
As with any simple dish, using good quality ingredients makes a difference, so use the best butter available.

1 lb thin green beans (haricot verts), trimmed
4 tbl butter
1/2 cup slivered almonds

- Cook the beans in a pot of boiling salted water until just tender. Drain.
- In a skillet, melt the butter over low heat. Add the almonds and toast until just fragrant, about 2 minutes. Add the green beans and stir to combine. Serve.

05 February 2007

London Calling


It is a point of contention between myself and my British-born boyfriend that I have never visited London. Despite all my travels, I’ve never made it there, unless a layover at Heathrow counts. When he first learned of this I was subjected to an all-out London campaign: London postcards in my mailbox, a London travel book curiously left in my apartment, the bombardment of Cadbury chocolates. But it was a little book lurking on my local library shelf that convinced me that London is the place to be.

The Moro Cookbook is a wonderful collection of recipes from the eponymous London restaurant. The recipes take inspiration from Middle Eastern and North African cooking but with a modern twist. I often find ‘Middle Eastern inspired’ recipes fall flat because the original version is just so much better, but that is not the case here. The authors, Sam and Samantha Clark, have managed to use many Middle eastern ingredients in new and innovative ways. In this case, rose petal jam (which is wonderful, find yourself a jar now!), and a fragrant warm spice rub for quail.

I adore quail, something about the perfect portioning for one person, the elegant little bones, the meaty flavor. This is the best preparation for quail I’ve encountered yet, make sure not to over cook them or they’ll become tough. I served mine with the jam on the side and with a nice triangle of minted mushy peas, keeping some of that British inspiration.


Grilled Quail with Rose Petal Sauce

4 quails, split down the backbone with scissors and flattened out
for the marinade:
1 garlic clove, crushed to a paste with salt
1 level teaspoon ground cinnamon
1 level teaspoon ground cumin
2 tablespoons rosewater
1 tablespoon lemon juice
for serving:
1/4 cup rose-petal jam
1/4 teaspoon ground cinnamon
a squeeze of lemon
candied rose petals or pomegranate seeds

- Mix all the ingredients of the marinade together and rub all over the quail. Place in a dish and marinate for at least 2 hours or in the fridge overnight.
- To make the sauce, mix the rose-petal jam (or substitute quince paste with rose-water) and cinnamon together in a bowl. Add the lemon juice and taste for seasoning.
- Heat a grill pan and brush well with oil. Grill the quail for 5-8 minutes each side until the meat is no longer pink but is still juicy. Serve the quail with the rose petal jam on the side and sprinkled with pomegranate seeds, candied rose petals, or pistachios.
 
Mercedes notes: I only marinated about an hour and I used one of those counter-top press grills (don’t press down hard though), and it was done in about 6 minutes and delicious.

04 February 2007

Game Day


It will be no surprise to anyone who knows me when I say that I’ don’t really get American football. My ideal football experience involves a bunch of people sitting around, watching the game, while I’m in the next room happily doing something else. Don’t get me wrong, I actually like the sound of the game coming from the next room, it’s somehow comforting, and popping in every once in a while to see what the score is. However, if it weren’t for numerous reminders, I wouldn’t even know when the superbowl was.

But since when did the superbowl become a food event? It seems every time I headed over to any recipe website this past week, hoping to scrounge up something good for dinner, I was bombarded with “superbowl food.” Everywhere I turned, magazine covers advertised ‘what to serve for the big game.’ Wings with blue cheese dip, guacamole, salsas, bowls of chili.

I have to admit most of these foods have never met the insides of my kitchen, but it did get me thinking about classic dips and spreads, which lead me to that staple of my Tennessee family, pimento cheese. Pimento cheese, classic spread of the South, a combination of cheddar cheese, mayonnaise, and those little roasted red pepper bits known as pimentos. If you (like me), find pimento cheese a bit cold and mayonnaise-y, I urge you to try it as filling in your next grilled cheese. Everything melts into a gloriously creamy interior between the toasted bread, and that’s before you even encounter the bacon. Grilled bacon-pimento cheese sandwiches, the outsides crispy with bacon fat, are quite the indulgence. Or, they’re just right for game day.


Grilled Bacon-Pimento Cheese Sandwiches
Gooey, crispy, somewhat excessive. Serve in small wedges with a cup of tomato soup.

for the pimento cheese:
1 lb cheddar cheese, grated
1/2 cup mayonnaise
1 small jar pimentos, or 1/2 cup diced roasted red peppers
tabasco sauce, to taste

for the sandwiches:
sliced bread
bacon slices, preferably thick, center-cut

Make the pimento cheese:
- Stir all ingredients together, refreigerate a few hours.
For the sandwiches:
- Fry the bacon in a large skillet until crisp and brown, set aside bacon on paper towels. If there is excess fat in the skillet, drain some of it off and set it aside, leave some fat in the skillet. Assemble the sandwiches: Spread pimento cheese on one slice of bread, top with a few bacon strips, top with the other slice of bread. Heat the skillet and fry the sandwiches until golden and crispy on both sides and the cheese is melted. Repeat with remaining sandwiches, using reserved fat if necessary.

Pimento cheese can also be served chilled, on crackers or celery sticks.

02 February 2007

A Guide to Syrian Kitchens and a Maple Tart

mapletart3
I had just moved into my flat in Damascus, excited over its wonderful views of the city, its wide kitchen, the nice furnishings, and most importantly the amount of space a transplanted New Yorker could only ever dream of at a fraction of the rent. (a patio, a washing machine, $200/month!) Relieved to be done with the hours of negotiations and the headache of trying to read through and sign a 5 page contract in Arabic, I surveyed my surroundings. The beautiful kitchen, my kitchen, with that gleaming 6-burner range induced dreams of home-cooked aromas. However, it turns out that stoves, or more specifically ovens, in Syrian kitchens are more like nightmares to any well-intentioned cook. Should you ever find yourself in this predicament, I offer A Guide To Your Syrian Stove:

1. The stove runs on gas, the tank for which is tucked somewhere underneath or behind the range. The tank will run out about every 1-2 months, at which point you have to go through the adventure of replacing it (that will have to explained another day). Just hope it doesn’t happen when you’re giving a dinner party or on a Friday, or you’ll be eating yogurt and raw carrots. Now, the burners don’t light automatically, so you’ll need matches or a lighter which should sit by the stove. And since there’s no pilot light, that means your oven doesn’t light automatically either.

2. Perhaps you are realizing with trepidation that you are going to have to light the oven by hand. Yes. Now, there are two dials on the range, one for the top of the oven and one for the bottom. The best way to do this is with a long candle, or find one of those lighters with a very long handle, rolled up newspaper will do in a pinch. Light your candle, open the oven, turn on the burner for the top of the oven, and light with the candle. Poof! There, have you successfully done that without catching yourself or your clothing on fire? Good. Now you have to light the bottom of the stove by pulling out the broiler tray. This can be a bit harder to reach, but you’ll get the hang of it.

3. And just when you thought your oven adventure was over, well, you may have noticed that your oven has no temperature markings. That’s right, you are the temperature regulator. You can adjust the top and bottom parts to high and low, which is precisely what you will be doing the whole time you are baking. Standing by the stove, peering through the little window, adjusting the flames in a desperate attempt to maintain at least a consistent temperature, whether it’s 300 or 400 degrees you’ll never know. At some point, you’ll turn the flames down too low and they’ll go out, so you’ll have to open the oven and go through that lighting process again. At another point, they’ll get too high and you might end up with a very blackened top or a crusty bottom.

It is at this point that I offer you my most salient advice. Bake casseroles, bake small cookies, things that you can leave in the oven at a low flame for a little while. Do not attempt delicate cakes. Abandon all hopes of soufflés. Trust me, you’ll be happier, and keep your sanity, which in this situation can be a precious thing.

Of course, upon moving into my kitchen, no one had warned me. I decided that I could use some of that lovely maple syrup a fellow expat had given me by making a maple tart. I pressed the tart dough, soft with freshly made butter, into its round pan. I stirred up the batter, the syrup like liquid gold, into the pan. And then I encountered the oven.

I fiddled with the oven’s knobs, I crouched and peered through the glass. At one point, the filling bubbled up into a huge dome, then immediately collapsed again. My stomach made a similar turn thinking I had wasted all that wonderful syrup. By the time I had taken it out of the oven, I had to be careful not to let the sweat that was literally dripping from my brow drop onto the tart.

However, my spirits were revived as the tart cooled and looked pleasingly unharmed. The kitchen was filled with the aromas of sugar and pastry. And when I could wait no longer, I took a bite. The sweet dark taste of maple recalled deep forest and snow, the tart crust redolent of French patisseries. In short, all the things missing from my life in Damascus. I looked over at my stove, sitting quietly in the corner. A battle, and a tart well won.


Maple Tart
Use good quality maple syrup, it makes a difference in the flavor and texture of the tart. This tart is very sweet, so it is best enjoyed in a small slivers with a nice dollop of whipped cream or creme fraiche.

paté brisée for a 9” pan
1/2 cup buttermilk
2/3 cup maple syrup
3/4 c. brown sugar
2 eggs
2 tbl butter
3 tbl flour
1 tsp vanilla
1 tsp lemon juice

- Prepare the paté brisée and press into a 9” tart pan, refrigerate.
- Preheat the oven to 375. Place the maple syrup and butter in a saucepan and simmer so that the butter is melted. In a medium bowl, stir together the brown sugar and the eggs until light and thickened. Stir in the buttermilk, maple syrup, flour, vanilla, and lemon. Stir until well combined, the batter will be thin. Pour the batter into the prepared pan and place in the oven. Bake the tart 30-35 minutes, until the filling is just set. Remove and cool on a rack. If desired, dust the top with confectioners sugar, serve slightly warm or at room temperature with whipped cream.