03 September 2011

Eggplants Stuffed with Cheese and Walnuts

DSC_0006
(We are currently traveling, and apparently in a country that randomly blocks blogging sites. It took me awhile, but I eventually figured out why I couldn't access anything. I've got a work around for the time being, here's hoping it continues to work. Cheers to free speech everyone!)

I couldn't resist buying these eggplants the other day, they were so firm and slender and fresh looking. But then I came home and got busy, and realized that most of the things I'd do with them- making stuffed eggplants with rice and meat, or makdous, or fettat makdous, were all pretty labor intensive, and I was quite a bit lazy.

DSC_0003DSC_0005

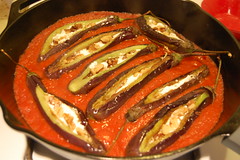
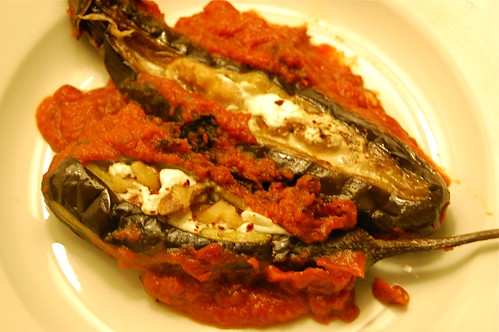
So instead, inspired by the most popular of Lebanese bloggers, I made this simplified version. First, you fry the eggplants lightly in olive oil until their outsides are well seared. Then you saute a diced onion in the same pan. While the onion is softening you slit the eggplants and stuff them with a mixture of seasoned goat cheese and walnuts. You add tomatoes to the pan, making a simple tomato sauce, and then you nestle the eggplants in the pan, cover and cook until done.

It sounds like it has quite a few steps, but really all you need is one cutting board, one bowl, and one pan to do this whole thing. Plus it's a one dish meal, some rice or bread and you're good to go.

DSC_0015
Eggplants Stuffed with Cheese and Walnuts

6-12 small slim eggplants, peeled in stripes
6 oz goat cheese
1/2 cup walnut pieces
1 pinch each cumin and cinnamon
1 small onion, diced
3 cups chopped tomatoes (fresh or canned)
1 small garlic clove, sliced
salt, black pepper, olive oil

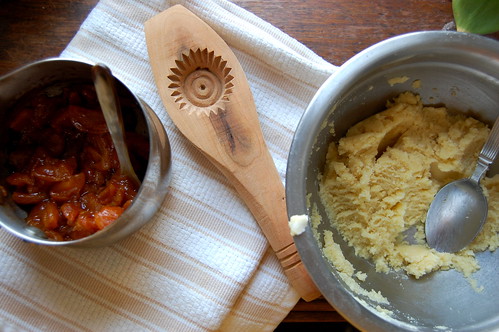
1.Mix together the goat cheese, walnuts, cumin, cinnamon, and black pepper in a bowl.
2. In a large wide sauce pan, heat a generous amount of olive oil (around 1/2 to 1 cup). Saute the eggplants until browned on all sides - they will not be cooked all the way through. Remove the eggplants to paper towels.
3. Add the onion to the pan with the remaining oil and saute until softened and translucent. Add the tomatoes and sliced garlic to the pan and season with salt. Bring tomatoes to a simmer.
4. Meanwhile, cut a slit lengthwise down each eggplant. Stuff each eggplant with the goat cheese mixture.
5. When the tomatoes are no longer watery, nestle the eggplants in the tomato mixture, with the slit facing up so the stuffing does not spill out. Cover the pan and simmer over low heat for about 20 minutes. Check on the pan occasionally to make sure the tomato sauce does not become too dry. The dish is done when the eggplants are tender all the way through. Season again with salt and pepper.

27 August 2011

Corn, Poblano, and Black Eyed Pea Sauté


It seems that, like the rest of the Middle East, the blog has taken a little bit of a Ramadan break. Perhaps I've gotten a case of what people call "Ramadan brain," a general blurriness that comes not from lack of food, but from the complete lack of sleep people endure during Ramadan. Thanks to everyone for all the comments and questions in my absence, I hope you all had plenty of time to dig into some frozen yogurt. Here's a few things that have caught my eye over the past few weeks:

--Overnight cooking star Ghalia Mahmoud in Egypt. (Watch a full episode here, if you're like me Egyptian Arabic always takes some getting used to :)

--The best kunafe for Ramadan, or anytime.

--Did you say challapeno?

--Anissa gives an awesome version of hummus (with pomegranate and red pepper)

I was making a bunch of these summer sautés this past month. They are almost always based on sweet summer corn sliced off the cob and sauteed with onion and beans and whatever else strikes my fancy. One week it's onion, corn, baby lima beans, cherry tomatoes, and chives. Another week it's black beans instead of limas and some very finely chopped turnips. Basically, it's whatever you think looks good at the market.

Corn, Poblano, and Black Eyed Pea Sauté
The staples here are onion, corn, and some sort of legume, other than that you can substitute vegetables as desired. Make sure to cut your vegetables into relatively similar size pieces so that they cook evenly.

1 small onion, finely diced
1 large poblano pepper
1 cup cooked black eyed peas
1 cup very finely sliced and diced carrots
3 ears of sweet white corn, corn cut from the cob
salt to taste
pinch of Aleppo pepper or black pepper
squeeze of lime juice, optional

1. Roast poblano pepper over gas flame or grill until blackened on all sides. Transfer to a bowl and cover with plastic wrap, let steam 10-15 minutes. Scrape blackened skin off pepper, remove the core of the pepper and dice the flesh. Reserve some of the poblano seeds if you want your saute to be spicy.
2. Heat a good glug of olive oil in a wide skilled. Add diced onion and a bit of salt and cook over medium heat until very soft and starting to caramelize, 15 minutes.
2. Add in the carrots and poblano and allow to cook until carrots are soft, about 10 minutes. Add the corn and black eyed peas, season with salt and pepper and cook until the corn is tender, about 3 minutes.
3. Taste for seasoning, adjust salt/pepper/add lime, serve warm.

31 July 2011

Frozen Yogurt with Sour Cherry Compote

DSC_0023
The title of this post should really be, "the easiest thing you will make all summer." Because it is. I have a thing for frozen yogurt, I always have. It's cold, it's tangy, it's light, and it satisfies my continual obsession with ice cream. The proliferation of frozen yogurt places in the U.S. (Sweetgreen, Yogenfruz, Pinkberry, etc) is great in my book because the frozen yogurt is tart and tangy and not overly sweet. There is one such place between my house and my yoga studio, and it taunts me every time I walk past, trudging home sweaty and tired. I have a rule limiting myself to one visit per week.

A few weeks ago I made the vanilla ice cream from David Leibovitz's ice cream book. (PS- For ice cream makers, this is the best ice cream recipe, and it even stays perfectly in the fridge for weeks without getting icy or anything, virtually unheard of in the land of homemade ice cream). Anyway, as I'm flipping though the book I alight (alighted? alot? ugh, you know what I mean) upon a recipe for tangy frozen yogurt. The recipe said stir together yogurt and sugar, process though ice cream machine.

DSC_0017

With some amount of skepticism as to the simplicity of this endeavor, I whipped up a batch. The unfrozen mixture tasted exactly as delicious as I'd hoped it would. Surely, I thought, it couldn't be this easy? But it was, delicious, homemade frozen yogurt in literally a matter of minutes. My only qualm is that it does get rock hard and icy in the freezer after a few days, which is good news for my local frozen yogurt shop, because I'll still be keeping them in business.

P.S. Ramadan Kareem to all those observing!


DSC_0018


Frozen Yogurt

It's optional if you want to add a splash of vanilla extract or other flavoring (Cointreau, orange flower water, almond extract, etc). I used good quality low-fat local yogurt for this. You can make a richer version by using thick Greek yogurt, but really whatever kind of yogurt you'd like, so long as it's plain, will work.

3 cups plain yogurt, cold
3/4 cup sugar

1. Stir together yogurt and sugar. Process through an ice cream maker according to the manufacturer's instructions. Transfer to the freezer to harden for about 1 hour. Best served fresh.

Sour Cherry Compote
1 1/2 cups pitted sour cherries
1/2 cup sugar
1/4 cup water

1. Combine in a saucepan. Boil until mixture is thick and syrupy and cherries have collapsed. Set aside to cool.

24 July 2011

Adana Kebab

DSC_0008
I was thinking I wanted to get a good summer grilling recipe up here, but the ones that came to mind--my favorite Aleppo-style kebabs with the spicy tomato sauce, and the kebabs with the sour cherries, well I've already told you about them. And then I thought, of course, Adana kebabs!

Now, there are all kinds of kebabs named for different regions of Lebanon, Syria, and Turkey - Urfa kebabs, Sulimaniya kebabs, Iskander kebabs, and I admit I've always been a bit fuzzy about what all these regional distinctions specify. But Adana kebabs, named for the Southern Turkish city in the region of Anatolia, are the most popular of all and you're likely to find them at many Middle Eastern places in the U.S. and Europe. My friend Adam likes to tell a joke about one time he ordered Adana kebabs in a restaurant, and the older Turkish waiter said, "you know in Adana, we just call it 'kebab.' " This joke only works when told with a thick Turkish accent.

Adana kebabs are made of ground meat (lamb or beef) heavily seasoned with spicy chili. The meat is molded around a thick flat skewer, and Adana kebab is almost always served over flat bread with grilled spicy peppers and tomatoes on top or alongside of the meat. Remember the pide bread we talked about a few weeks ago? Here's where you want to use it.

The number one rule to making Adana kebab is season, season, season, and then... season some more. Ground meat can take a lot of seasoning (the same applies when making burgers, and if you think about it, this is really like a burger on a stick). And you want these kebabs to be spicy. You want rich fatty ground meat, something to make the grill flare up and give the meat a nice char. Other than that it's pretty simple- grilled ground meat, grilled vegetables, bread soaked with the meat juices. An easy summer meal.

DSC_0005DSC_0013

Adana Kebab
It is important that you do not use lean meat- you may have to ask your butcher to grind a fattier cut for you, or you can add in fat (like chilled butter or preserved lamb fat). Whatever types of dried or fresh chilis you use, it is only important that they are spicy!

1 1/2 lbs ground lamb or beef, preferably 80% lean
2 teaspoons cayenne pepper OR 4 small Thai bird chilis, ground to a paste
2 teaspoons ground cumin
2 teaspoon ground coriander
2 teaspoons ground black pepper
salt to taste

plum tomatoes, peppers, for grilling
pide bread, chopped parsley, and sumac, for serving

1. Knead together the meat with the seasonings until well combined and sticky. Chill one hour. Form the mixture around kebab sticks (preferably flat ones) making one long oblong kebab, or several smaller oblong oval shapes.
2. Prepare your grill. Thread the plum tomatoes and peppers on skewers for grilling if using.
3. Grill the kebabs over the flame. Place the tomatoes and peppers just to the side of the kebabs, slightly off the direct flame. Beware, the kebabs will flare up, that is desired. Grill until nicely browned on both sides.
4. Immediately place kebabs over pide bread. Place grilled vegetables on the side. Garnish with chopped parsley and sumac. Serve.

19 July 2011

What To Do with Summer

DSC_0098
Well, first you eat it. All the summer peaches and corn on the cob and tomatoes and the last of the lettuce in your garden that is wilting in the heat, you eat all that you can. And then when you're done with that, when you've abundantly bought too many things at the market, when your table groans with berries about to go bad, then you preserve it.

You look up every Christine Ferber strawberry jam recipe (here, here) and decide they are all too complicated and you don't have two days to spend making jam, and instead you improvise your own version. Skimming, skimming, skimming the foam off the jam as it cooks ever so slowly. Then canning and preserving for winter.

DSC_0100

You shuck fava beans and freeze them, you make tomato sauce out of those pricey beautiful huge heirloom tomatoes, peeling them, seeding them, chopping, using an old Marcella Hazan recipe. And in the end you discover it tastes like .... tomato sauce.

DSC_0108DSC_0109

Sour cherries are available about 4% of the year (yes, I calculated) and so you buy up all you can, and then you spend so long pitting sour cherries and listening to pod casts that you get a neck cramp. Paul would advise you that sour cherry pie is the "the best thing ever," but I also like sour cherries in savory things like rice pilaf and kebabs.

DSC_0140

And speaking of preserving, this little piece via the New Yorker just lit up my day. The title alone is great: Suicide in the Garden, Murder in the Kitchen.

It's funny how some of the things I've been making are so vibrantly flavored that they almost taste fake--the strawberries so intense they almost taste like imitation flavoring, tomatoes so naturally sweet without any added sugar. Has anyone else noticed this? Back soon with a recipe....

10 July 2011

Turkish Pide Bread

DSC_0143

Pide bread is the Turkish version of flatbread. It is puffier and richer than other flatbreads in the region, and totally delicious. Traditionally shaped in a long flat oval, it can also serve as a bed for toppings, such as roast eggplant or tomato and cheese, the Turkish version of pizza. Pide bread can also serve as a vehicle for kebabs, placing the long kebab over the long pide bread and topping the whole thing with grilled tomatoes and peppers and chopped parsley.

DSC_0145

The plain pide bread is either roughly dimpled with your fingers or scored with a knife in a cross hatch design. My pide shaping skills still need some work. Like most flatbreads, these are best the first day they are made, but they keep well and can refresh nicely when reheated in the oven or toaster.

DSC_0147

Pide Bread

Adapted from Annisa Helou.

2 1/4 teaspoon yeast (1 package)
3 cups flour
2 teaspoons sugar
2 teaspoons salt
2 tablespoons olive oil
warm water

optional: egg wash, sesame seeds

1. Dissolve yeast in 1/4 cup warm water in a large bowl. Stir in the flour, sugar, salt, and oil. Gradually add 2/3 cup warm water to form a dough. Knead the dough to form a smooth elastic ball of dough, about 10 minutes.
2. Rinse out the bowl, oil it, and cover with plastic wrap or a damp towel and allow the dough to rise in a warm place for 1 hour. Punch down the dough and let rise another 45 minutes.
3. Preheat oven to 425 F. Grease a baking sheet, divide the dough into long oval loaves (you can make one very long loaf or several smaller ones). Place on the baking sheet, cover with a damp towel until the dough is slightly puffed, 10 minutes. Dimple the dough with your fingers. If desired, brush with egg wash and sprinkle with sesame seeds. Bake 20 minutes for smaller loaves, 30 minutes for one large loaf, or until golden and firm. Eat fresh.

02 July 2011

Beef Tagine with Prunes

DSC_0154

Jonathan Franzen writes of Washington DC, "the pedestrians in every neighborhood all seemed to have taken the same dowdiness pills. As if individual styles were a volatile substance that evaporated in the vacuity of D.C.'s sidewalks and infernally wide squares. The whole cite was a monosyllabic imperative directed at Katz's beat up biker jacket. Saying die."

I'm inclined to agree with Mr Franzen, and with this group of people. Don't get me wrong, I have a fantastic house here (the size of which I could afford about 8% of in New York), and a yard for gardening, a nice car and a good stable job and lots of good friends. And there's a lot more character in DC then there used to be, there's Birch and Barley and the lobster truck and movies at E Street and cool furniture shops on 14th Street. But a little bit every day, I feel the corporate government dullness of DC slowly sucking my soul.

DSC_0146

People keep talking about this thing called my "career trajectory," which always makes me picture, with horror, that my job is a shooting rocket just dragging me in its path. So I'm thinking a lot about jobs and careers and is going back to school really the right thing in this economy and will anyone even want to hire me and do I really want to move and is having a career really such a bad thing, and why oh why are DC drivers so horrible?

And this uncertainty is probably why I'm making rich comforting stews like beef tagine in the middle of summer when my diet should be consisting of summer tomatoes, corn, and soft-shelled crabs. But the beef tagine my friends, is really fantastic. I've made it a few times now, cooking the beef over several hours with prunes and spices until everything melts together in a thick sweet sludgy mixture. Like many Moroccan dishes this verges on the edge of sweet, and though not traditional I like to add some chli flakes to keep things balanced out. The dish reminds me strongly of Mexican mole negro, also black and sweet and spicy. It's one of those recipe you make once or twice and remember how to do from memory, long slow cooking on a Sunday afternoon, something to bookmark and make on a day when you need something warm and comforting.

DSC_0149
Beef Tagine with Prunes


2 lbs beef stew meat
salt, pepper
olive oil
2 teaspoons cinnamon
1 teaspoon ground ginger
2 teaspoons cumin
1/4 teaspoon turmeric
optional: 1 small diced chili or 1 tsp of Aleppo pepper or mild dried chili pepper
1 large onion, diced
12 oz prunes, diced
2 tablespoons honey
a few sprigs of cilantro leaves, diced
sesame seeds for serving

1. Season the meat with salt and pepper. Mix together the spices and toss with the meat to coat. Heat some olive oil in your tagine (or a dutch oven) over medium heat. Sear the beef until browned on all sides. Add water to just cover the meat, bring water to a simmer, put the lid on the pan and simmer on low for 45 minutes.
2. After 45 minutes, add the onions, chili if using, prunes, and honey and season with salt. Cover the pan again and simmer for 2 hours. Check on the mixture every 20 minutes or so, add more water if the mixture starts to look dry. Gently mash the mixture with the back of a spoon as it cooks, encouraging it to form one cohesive sticky sauce. As the sauce thickens toward the end of cooking, make sure it doesn't stick to the bottom of the pot and burn.
3. At the end of the 2 hours, the meat should be tender and falling apart, if it isn't keep cooking it gently. A few minutes before taking the dish off the heat, stir in the cilantro. The sauce should be thick and sticky. Taste for seasoning. Season with additional salt/chili/honey as necessary. Ladle the tagine over couscous. Sprinkle sesame seeds on top to serve.

27 June 2011

How to Make Steamed Couscous

DSC_0127
The proper way to make couscous, the Moroccan way, is to steam it. For those of us who grew up with the couscous in a box--and I think that's most people in the US--why would you bother with steaming when that box stuff cooks in five minutes? Well, because steamed couscous is light, ethereal, fluffy, and full of flavor. The last time I made instant couscous it came out like a clumped brick.

Steaming couscous is a bit time consuming, but it's meant to cook on top of whatever stew or tagine or other dish you have going. And as is often the case with stews, steaming the couscous is a welcome distraction as you wait for the meat to get tender in that seemingly endless 2 or 3 hours of stewing.

The basic technique is this - couscous, which is basically teeny tiny pearls of semolina pasta, is tossed with olive oil to coat. Then it is tossed with water, placed in a steamer basket (I line mine with cheesecloth because the holes are fairly large) and steamed either over water or over whatever you are cooking. You steam the couscous for about 15 minutes, then you remove it from the heat to rest, fluffing it, then you repeat the process. If you're lazy, two steamings will suffice, but thorough cooks will do as many as four steamings.

Couscous is typically served plain alongside a flavorful stew, kind of like rice alongside Chinese. One of the ideas behind steaming the couscous over the stew (besides being economical) is that the couscous absorbs some of the flavor of the stew. I like to think of steamed couscous kind of like fresh pasta: no you're not going to make it every day, but it's wonderful when you do.

Steamed Couscous

The traditional vessel for this is called a couscoussier, kind of like a double-boiler but the top vessel has a mesh bottom, however any old steamer combination of pots will do. Non-instant couscous is readily available in many grocery stores- Bob's Red Mill is one common brand, and some specialty shops carry the Mhamsa brand of hand-crafted Tunisian couscous.

1 lb couscous (not instant)
2-3 tablespoons olive oil
water
salt

1. Have a steamer set up over simmering water or stew, line the steamer with cheesecloth if it has large holes. In a large bowl, rub the couscous together with the oil with your finger tips. Then toss the couscous with 1/2 cup water. Rub it together again with your fingers, you will feel it start to plump a bit. Scrape the couscous into the steamer, cover, and steam 15 minutes.
2. Place the steamed couscous back in the bowl, toss to break up clumps, and let cool for a few minutes. Now toss the couscous with 1 cup of water and a pinch of salt.
3. Steam the couscous again for another 15 minutes. Remove the couscous back to the bowl again and cool for a few minutes. Now toss the couscous with 1 to 1 1/2 cups water (depending on how done the couscous feels, you don't want to over-saturate it).
4. Steam for a final 10-15 minutes- taste for doneness. Fluff the couscous a final time, maybe add a pat of butter, and serve as desired.

23 June 2011

White Peach Crisp with Cardamom and Orange Blossom Water

DSC_0134

We welcomed summer with a picnic in the park marked with cheap Prosecco and homemade sourdough and stinky cheese, cute babies on blankets, a game of wiffle ball, and everyone dashing home just before the thunderclouds broke. My cooking recently has been much the same - impromptu, simple, easy. Sliced summer tomatoes. A bowl of peaches. Summer squash tossed in a crust with eggs, cream, cheese, and breadcrumbs. Nothing measured. Crusts made by the feel of the dough, the crumbliness of butter. Ratatouille made with the end of the week's vegetables.

DSC_0123

It makes for good eating but it certainly doesn't make for good blogging. There was one thing though - a white peach crisp. I have a thing for white peaches. They are delicate and floral, and they blush pink. They are almost too precious, but when baked they develop a bit of uumph, topped with a crumbly crust of brown sugar and accented with cardamom and orange blossom water. Those last two ingredients add an extra touch to this dish, but it would be perfectly delicious without them.

peaches


White Peach Crisp with Cardamom and Orange Blossom Water

Ripe peaches are sweet enough that I don't think they need extra sugar. You can peel the peaches with a knife or blanch them to remove the skin.

12 white peaches
3 tablespoons flour
1 tablespoon orange blossom water
1/8 teaspoon cardamom

1 cup brown sugar
1/2 cup flour
1/2 cup oats
1 pinch salt
8 tablespoons (1 stick) butter

1. Preheat oven to 415 F. Combine the crisp topping dry ingredients. Cut in the cold butter with a pastry blender until small crumbs form. Refrigerate crumble topping.
2. Peel and slice peaches into a bowl. Add the 3 tablespoons flour, cardamom, and orange blossom water. Toss together and place in a baking dish. Scatter the crumble over top. Bake 20 minutes, turn the temperature down to 375F and bake another 15-20 minutes, until peaches are soft and topping crisp.

08 June 2011

Two Fun Videos and Scenes from the Farmers Market

First of all, I discovered this cool video of making the Syrian pastry Ghazal al-Binat:


Ghazal al-Binat literally means the flirtation of girls (also a famous Egyptian film), and it's kind of like candy floss-- thin ethereal whipped threads that melt in your mouth-- stuffed with a sweet pistachio filling.

Check out Andrew Zimmerman tasting Syria. Okay, so the script is a little, umm, dumb-American sounding, but it's a nice intro into some of the weirder foods of Syria, and a flattering portrayal of the Syrian people (which is quite accurate!).

Also, hello, Foreign Policy has a food issue! People after my heart. I highly recommend this piece, "Eat, Drink, Protest."

In more local news, growing my own mache lettuce:
DSC_0069

Beautiful early summer market produce:
DSC_0087
DSC_0084
DSC_0107
DSC_0116
if only my nasturtiums ever looked like this:
DSC_0079

Happy summer everyone!

04 June 2011

An Easy Moroccan Salad

DSC_0085
Moroccans like to make salads with oranges (think orange and artichoke salad, blood orange salad) and olive and orange salad is the most classic of them all. We may think of oranges as almost to delicate and juicy for salad, but when properly supremed or simply cut along the bias, they can be quite substantial. At its simplest this is just a salad of oranges and olives, but I like to add some slivers of red onion and perhaps a bit of diced cilantro for uumph. A nice pinch of salt is important to keep the salad on the savory side.

I used Moroccan baladi olives, which I found at a local shop. They are wrinkly and mildly flavored and taste as if they have been marinated in spices, perhaps cumin or allspice (I don't know if that's true, please chime in if you do). But any mild olive will do. The salad is light and refreshing and perfect alongside a heavier dish, like bistaeeya. It can also be used as a topping for grilled fish.

Orange and Olive Salad

3 large oranges (something with thick substantial segements)
olive oil
salt
6-8 black olives, preferably Moroccan baladi style
2 tablespoons diced cilantro
about 1/4 of a small red onion, sliced as thinly as possible and then diced

1. Working over a bowl to collect juice, supreme the oranges, placing the segments in another bowl. Add a pinch of salt to the orange juice, then whisk in the olive oil and the red onion to make a dressing. You should use twice as much oil as you have orange juice, you can eyeball it if you don't want to measure.
2. Gently mix the diced cilantro in with the orange segments. Tear the olives into pieces with your fingers, it can be rustic looking. Arrange salad on a platter. Spoon the dressing over the salad, you will not need all the dressing. Serve salad immediately, reserve remaining dressing for another day.

28 May 2011

Tasty Beef

DSC_0020

Yes indeed, today's recipe really is called "tasty beef rolls." I'm sure it has a real name, but the family that taught me to make this dish called it that, so that's what I call it too.

But first, I want to talk about the Italian-Syrian connection. Between 828 and the early 1700's Italy, specifically Venice, acted as a bridge between the East and West. A robust trading relationship existed, with trade with the Mamluk empire (at that time ruling Damascus and Egypt) counting for 45% of Venetian maritime trade. The relationship is depicted in a few famous paintings, including "The Reception of the Ambassadors in Damascus," 1511. Though that relationship petered out with the rule of the Ottoman empire and the boom of the American new world, remnants of the relationship are seen throughout Syria. There's the large number of Italian students crowding the halls of University of Damascus, mortadella is one of the most popular choices for a Syrian sandwich, and many similarities are seen between traditional Syrian and Italian woodwork and other crafts.

DSC_0021

So, you won't be surprised when this dish looks a little bit Italian, it even looks like it could be a distant cousin of that Italian-American classic the braciole. I don't know the origins of this dish, heck I don't even know its real name. But it is indeed tasty (laziza, in Arabic).

Basically you take some meat, pound it out into thin little squares, and you stuff them with a mixture of garlic, herbs, really whatever you'd like. In this one I've added in some diced up dried apricots, which is traditional in some Syrian families. I also added a diced up carrot, because I felt I was needing my vegetables, which is not traditional, but I think it's a nice addition. Then you roll up the beef into little rolls. Traditionally this is tied with a needle and thread, but I just used a toothpick (easier to make and to eat!). The beef is then simmered in a simple tomato sauce until tender. Yes, it's a little tedious to make the rolls, but it's really delicious, and manages to be both hearty and light at the same time. So there you go, tasty beef rolls.

DSC_0022

Syrian Style Beef Rolls
If using fresh tomatoes that are very watery, drain the watery seed part and use only the flesh (in which case you may need more tomatoes). You could probably do this with a different cut of beef, I've just never tried it. Also, if you have a bit of leftover filling after stuffing the rolls, you can just saute it with the onion when making the tomato sauce, as I did in the photo above.

1/2 lb sirloin steak, sliced
3 garlic cloves
1/2 cup chopped parsley
1/2 cup chopped cilantro
1/4 cup finely diced dried apricot
1 carrot, cut into very fine dice
1/4 teaspoon each cumin, allspice
juice of 1 lemon
1 onion, chopped
24 oz chopped tomatoes (fresh or canned)
olive oil, salt, and pepper to taste

1. Smash garlic in a mortar and pestle to a paste. Place garlic in a bowl with parsley, cilantro, apricot, carrot, cumin, and allspice. Season with salt and pepper. Add lemon juice and olive oil, dressing the mixture as if it were a salad.
2. With the spiky side of a meat mallet, pound out the steak squares. Place a bit of filing on each square, roll up, and secure with a toothpick. Place the rolls on a tray as you work, then sprinkle them lightly with salt.
3. Heat some olive oil in a large wide pan. Saute the chopped onion until translucent. Add the beef rolls to the pan, searing until lightly browned on all sides. Add the tomatoes and season with salt and pepper as necessary.
4. Bring to a simmer, loosely cover the pan, and let simmer for about 30 minutes. Check the pan occasionally to make sure it is not dry. Cooking time will depend on how thinly you cut the beef and how big your rolls were. The best way to test for doneness is just taste a bit of one of the rolls.
5. Serve beef with tomato sauce over rice or as desired.

17 May 2011

Apricot Ma'amoul

apricot ma'amoul
There is a beautiful pastry shop in the bottom of one of the hotels in Damascus, I can't remember its name but somewhere near Sepky Park, that sells the most refined versions of Arab sweets. The tiniest baklava you've ever seen, cookies filled with date puree so light it was almost like custard, and the most elegant ma'amoul in a variety of seasonal flavors - plum, peach, apricot, fig. I was inspired by those to make my own apricot ma'amoul, though much more rustic and humbling in appearance.

But the flavor is there, tart, tangy. I miss good fresh apricots, the kind that would arrive in Damascus on trucks everyday, just picked, dripping the moment you bite into them. They are hard to find like that farther away from the Mediterranean (goal: move back closer to to the Med). So this time I used dried apricots, just re-hydrated and simmered in a bit of honey and cinnamon and allspice. I'm pretty sure Paul ate most of them, which has to be a good sign.
apricot ma'amoul

Apricot Ma'amoul

Ma'amoul molds, like the one pictured above, are available at Middle Eastern groceries or can be ordered online. Depending on the size and style of your mold, you may need more or less filling for the recipe (it depends on how thin you make the crust). Makes about 40 small size cookies.

crust:
1/2 cup solid shortening
8 tablespoons or 4 ounces butter
1 cup flour, all purpose
2 cups semolina
1/4 teaspoon salt
1/4 teaspoon baking power
1/4 cup granulated sugar
1 teaspoon rose flower water and
1 teaspoon orange flower water
7 tablespoons water

filling:
1 cup chopped dried apricot (chop into small pieces)
4 tablespoons honey
1/4 teaspoon each cinnamon, allspice

1. Bring 2 cups of water to a boil, pour over apricots, let stand to soften while you prepare the crust.
2. Prepare crust: Melt the shortening and butter in the microwave in a large bowl. Add the flour, semolina, salt baking powder and sugar and stir to combine. Add the rose and orange flower waters and gradually add the water, stirring to make a crumbly dough. Put the dough in the fridge to rest while you make the filling.
2. Filling: Scoop out apricots and place them in a sauce pan with about 2 tablespoons of their water (reserve remainder of soaking water in case needed). Ad remaining filling ingredients in a saucepan and cook over low heat for 10-15 minutes, adding water as necessary, until the apricots are very soft and mashed together.
3. Preheat oven to 325 F. Flatten a tablespoon of the semolina dough in the palm of your hand. Add a small amount of filling. Fold up the semolina around the filling, adding a little more dough to enclose the ball. Roll into a ball and press into a mold, or simply place on a greased baking sheet and decorate the top with the tines of a fork.
4. Bake 12-15 minutes until solid but not darkened in color. Let cool, then shift powdered sugar over top.

26 April 2011

Fakhda bil Furn: Roast Leg of Lamb

DSC_0207
I hope everyone had a happy Easter (or Passover) holiday. I've been spending a lot of time following the recent events in Syria and wondering what I should say here in this space. Some good friends of mine traveled to Syria in early March, before any hint of crisis, and sent me the most wonderful letter. In it he writes,

"and then the men's club always loud with talk as the men play backgammon or cards in clouds of cigarette smoke on wooden tables in wooden chairs. It is the same quality sound I heard outside a Czech men's bar before the wall fell, hearty unabashed civilized man buzz, a beautiful song of comradery, and I'm not talking NFL fanny patting."

It is such a beautiful letter, and that image, the image of Syria like East Germany before the wall fell, is one that rings true for me now. I've been closely following blogs and facebook, checking in with my Syrian friends, reading the nuanced reporting of Anthony Shadid and Cal Perry. I have much to say, perhaps too much to say, but all I will say now is that I hope all the Syrians I've known, kind, generous, welcoming people, are staying safe and out of harms way.

DSC_0220

For Easter (or really any holiday), we have a very festive dish called fakhda bil furn, which translates to leg of lamb in the oven. The lamb is very simple, marinated with garlic and spices and roasted in the oven until just done. But it's the pilaf that accompanies the lamb that makes this a full dish. Here I've made the pilaf with freekia (roast green wheat) but it is often made with rice. The pilaf is studded with ground meat and onions and not. Often, this dish is a meat festival, the pilaf packed with pounds of ground meat. But I like to make the meat merely an accent in my pilaf, letting the spices and nuts come through as well (and also making the dish a tad lighter!).

DSC_0221

The carving job we did in these photos is atrocious, but this can really be a beautiful dish. Present the carved lamb on top of the pilaf and toss some sauteed almonds and pistachios on top.

DSC_0225
Fakhda bil Furn Roast Leg of Lamb with Pilaf

for roasting:
1 6-pound bone-in leg of lamb
2 carrots, roughly chopped
6-8 pearl onions, peeled

marinade:
2 garlic cloves
pinch salt
2 tbl olive oil
2 tbl white vinegar (or lemon juice)
1 tbl oregano
1/2 tsp each allspice, cinnamon, cumin
a few grinds of fresh black pepper

pilaf:
2 tablespoons butter
2 cups freekia or rice
1 large onion, diced
1/2 lb ground lamb
1/2 teaspoon cinnamon
12 teaspoon cumin
1/3 cup pine nuts
1/3 cup blanched almonds
1/3 cup blanched pistachios
salt to taste


1. Trim all visible fat from the leg of lamb. Crush the garlic in a mortar and pestle with the salt. Mix in the remaining marinade ingredients and rub over lamb. Cover and refrigerate overnight.
2. Preheat oven to 425F. Straddle a large roasting pan over two burners. Sear the lamb on medium-high heat until browned on all sides. Transfer to the oven and roast for 20 minutes. Lower the heat to 325F, add the carrots and onions, and roast for an additional 45-60 minutes. The lamb should read about 130F on an instant-read thermometer for medium rare. (Time will vary depending on weight of lamb). Remove, tent with foil, and let rest before carving.
3. While the lamb is cooking make the pilaf. In a large pot, melt 1 tablespoon butter over medium-high heat. Saute the onion until translucent, then add the ground lamb and saute, breaking up into bits, until nicely brown. Add the freekia and spices and stir for a minute to toast. Add 4 cups of water, bring to a simmer, then cover the pot and cook on low heat. Cook until freekia (or rice) is tender, about 20-25 minutes.
4. In a small pan, melt the remaining butter, add the nuts and toast until golden.
5. Carve the lamb. Arrange the pilaf on a platter, place the lamb over top, arrange the roast carrots and onions around the lamb. Sprinkle the toasted nuts over the top and serve.

15 April 2011

Chickpeas with Date Masala

DSC_0257
This blog is named for my love of dates, which often don't make it into a recipe because I'm busy gobbling them all up. However, I've made this chickpea and date recipe several times recently, including for two dinner parties. People rave about it every time.

The recipe is from the New York Times, but being me, I've completely altered it. I moved the spices around a bit for a warmer less sharply spicy feel, and I've increased the masala-to-chickpea ratio. Most of my Levantine Arab friends hate Indian food, a trend I've observed widely, and which I haven't quite figured out. They don't like things that are spicy hot and for some reason the Indian style of cooking doesn't appeal to them (if anyone wants to explain this to me, I'm all ears). But in this recipe I think I've something to appeal to anyone, the dates melt into a luscious thick sauce and the spices are warm and comforting. It's also a snap to make.

DSC_0261


Chickpeas with Date Masala

Serves two very hungry people for lunch, or 4 as a side dish.

3 cups cooked chickpeas (from 2 15-oz cans or cooked from scratch)
1/4 cup olive oil
1 small onion, peeled and finely diced
2½ tablespoons tomato paste
12 medjool dates, pitted and chopped (or another soft sweet variety, like deglet noor)
1/4 teaspoon ground black cardamom
4 teaspoons ground cumin
2 teaspoons kosher salt
1 teaspoon Aleppo pepper
1/2 teaspoon ground ginger
2 whole star anise

1. Drain chickpeas and set aside. Combine all spices (cardamom through star anise) in a small bowl.

2. In a medium pot set over medium-high heat, heat the oil until it begins to shimmer. Add the onions and sauté for a few minutes, until they have softened and started to brown. Reduce heat to medium and stir in the tomato paste. Add the spice mixture and allow to toast for a minute or two.

3. Add the chickpeas, dates, and ½ cup or more of water, enough to make them less than dry. Simmer the mixture for about 30 minutes, stirring occasionally to incorporate the flavors, until the dates have fallen apart and the chickpeas are very tender, you may have to add a splash of water if the pan gets dry. Serve warm.

09 April 2011

Home-Style Schwarma

DSC_0260
I have been traveling a lot recently, and while I have always thought of travel as a great culinary experience, I've come to realize it can also be the complete opposite. It can be stuck on the tarmac in a snow-delayed flight with 2 screaming infants and no breakfast in sight, it can be hours of driving across wasteland where even fast food is hard to find, it can be places so unsanitary you are taking your life in your hands by eating.

DSC_0252DSC_0253

Schwarma stands are ubiquitous in the Middle East, tall cones of fat and meat dripping and glistening in the light, eaten after a late night of drinking or as a quick meal. I've never been super-excited about schwarma (also called a gyro), but this past week a good schwarma stand was the most exciting part of my week, which was otherwise dominated by hours of work fortified by Cliff bars.

Restaurant-style schwarma is not something to be made at home (it involves layering chunks of fat, marinated meat, and seasoning on a giant stick and cooking it on a rotating spit). However, many Arab cooks make a homestyle version of schwarma made with thinly sliced lamb or beef broiled in the oven. It makes a great sandwich, and I can picture making a large batch of this and having sandwiches everyday for lunch. I like mine with tomatoes, mint, lettuce and tahini sauce.

DSC_0259DSC_0255

Home-Style Schwarma

The meat will appear very greasy when you take it out of the oven- that's exactly how it should be. Adapted from Maria Khalife.

2 lb sirloin steak, cut into julianne strips
1/4 tsp ground mastic (optional, available at Middle Eastern shops)
1/8 tsp each cardamom, cloves, nutmeg, allspice, and black pepper
1/4 tsp cinnamon
1 tsp salt
zest of 1 lemon
1/4 cup fresh lemon juice
1/4 cup olive oil
4 tbl finely minced fat (optional)
2 garlic cloves, minced

for sandwiches
: flatbreads, tomatoes, shredded lettuce, mint, tahini sauce

1. Combine all ingredients except minced fat, cover, and marinate overnight.
2. Preheat oven to 400 F. Place meat and marinade into a baking dish, add fat if using, bake for 30 minutes until most of the excess liquid is evaporated and the meat is nicely browned. Serve warm.