30 August 2013

Chocolate-Oat-Cherry-Pecan Cookies

DSC_1096

I don't really have much to say about these cookies. They're cookies. They are good. They have a crunch from pecans and a sour-sweetness from cherries. They would probably be good as ice cream sandwich cookies but we ate them too fast to find out.

It is the end of summer and instead of talking about cookies I'm going to go soak up our last leisurely days at the pool. Continue to plow through novels and short stories. Enjoy the slow pace of an entire country that has taken their annual summer vacation, stores shuttered with "back in September" signs.

DSC_1100

Maybe I'll make lunch out of a simple sliced tomato with a slick of mayonnaise. Or maybe stir up some more cookies. Or do absolutely nothing at all. I hope you do the same.

DSC_1101

Chocolate-Oat-Cherry-Pecan Cookies
Ch-O-Che-Pe cookies? Ch-O-Pe-Che? Whatever you call them, they're delicious. If you want to use all-purpose flour instead of the rye and graham, you should use 1 1/2 cups flour.

3/4 cup graham flour
1/2 cup plus 2 tablespoons rye flour
3/4 teaspoon baking powder
1/2 teaspoon baking soda
1/2 teaspoon salt
170 grams (3/4 cup, 6 oz) butter, softened
1 1/4 cups dark muscovado sugar
1 large egg
1 teaspoon vanilla extract
1 1/4 cups oats (preferably old-fashioned rolled oats, not instant)
1 cup pecans, roughly chopped
1 cup dried cherries, roughly chopped

1. Preheat oven to 350 F. Grease or line cookie sheets.
2. Combine flours, soda, baking powder, and salt, in a small bowl.
3. In a large bowl, cream the butter with the dark muscovado sugar. Cream until smooth and light and fluffy, Beat in the egg until well combined and add in the vanilla. Fold the flour mixture into the butter until there are no more streaks of flour. Fold in the oats, pecans, and cherries.
4. Dollop cookies in about 2 tablespoon size balls onto cookie sheets, placing the balls several inches apart. Bake the cookies until spread out and tops are cooked, about 12 minutes. Continue baking cookies in batches and cooling on a cooling rack. Store in an air-tight container.

23 August 2013

Chraimeh (Fish in Spicy Tomato Sauce)

DSC_0889

We have a running joke about all the things you need to stock a true Algerian pantry:
  • A 60-pound bag of fine grain semolina, which is used to make most breads and doughs. 
  • Giant cans of tomato paste - I can't tell you how many times I've bought a big can thinking it was canned tomatoes, and found it to be filled of tomato paste. It wouldn't be an Algerian recipe without copious amounts of tomato paste. 
  • Peppers- fresh, dried, ground, harissa, salads, etc.
  • Olives
  • Tuna, lots and lots of tuna
  • Honey
  • Paprika, cinnamon, cumin, caraway, canola oil
  • Couscous, preferably multiple varieties including barley couscous
  • Selecto
You get the idea here.
DSC_0885

Chraimeh is a dish that is found throughout North Africa, but is probably best known as being a specialty of Tripoli, Libya and is also often found in Morocco (though Saveur recently published a Tunisian one). It involves thick fish fillets bathed in a spicy tomato sauce. You'll see based on the ingredient list that it fits squarely into that North African pantry tradition. It's a very simple dish to make, but has tons of flavor, and comes together quickly for a weeknight dinner. I've used the wholly untraditional salmon, but sea bass and swordfish are the most common fish for this dish. You want either very thickly cut pieces or a steak cut of the fish. Pair it with a semolina bread and a grilled pepper salad and you've got a classic North African meal.

DSC_0887

Chraimeh (Fish in Spicy Tomato Sauce)
I originally coated the fish in flour when sauteeing it, which prevents sticking but also prevents the fish from absorbing the spicy tomato flavor later on, so I've removed that step. If you have particularly large pieces of fish you may want to let them finish cooking in a preheated 400 degree oven.

olive oil, salt, pepper
1 onion, finely diced
5 cloves garlic
1/4 teaspoon caraway seeds
1 teaspoon cumin
1/4 teaspoon hot paprika
1/8 teaspoon cayenne pepper or harissa or chile paste
1 small red chile, seeded and finely diced
1 teaspoon sugar
6 ounces (1 small can) tomato paste
1/2 cup tomato puree or diced canned tomatoes
2 lemons
4 steak-cut pieces of salmon or swordfish, or thick slices sea bass
a lot of chopped cilantro, probably half of a typical cilantro bunch

1. Season the fish with salt and pepper and squeeze some lemon juice over the fish. Heat a generous amount of oil in a wide deep skillet (12" cast iron is great). Sear the fish briefly on each side until just browned, but not cooked though. Remove the fish to a plate.
2. In the same skillet, saute the onions in olive oil over medium heat.
3. Meanwhile, bash the garlic in a mortar and pestle with a pinch of salt to get a thick paste. Add in a tablespoon of olive oil, the caraway seeds, cumin, paprika, cayenne, and fresh chile, and pound in the mortar and pestle to make a paste. Alternately, you can do this in a small food processor, though the texture will be less smooth.
4. Add the garlic-spice paste and the tomato paste to the pan and let toast a bit. Add in 2 cups water, the tomato puree, sugar, and the juice of one lemon, and stir everything to combine. Let simmer on low for about 5-10 minutes or until flavors are combined and sauce is thickened
5. Nestle the fish into the sauce and let cook for 5 minutes, then turn the fish over and cook another 5-10 minutes, or until done. The cooking time will really depend on how big your fish pieces are. Sprinkle the cilantro over and serve immediately.


17 August 2013

Apricot Jam

DSC_0866

Apricot jam is, in my mind, the pinnacle of jams. Some people may like raspberry or current or strawberry (ick), but really, my favorite is apricot. The apricot season is so short and fleeting, and even shorter is the season when apricots are really good and juicy, because about two of the three weeks of apricot season are filled with cottony-dry and bruised over-ripe apricots (for those, roasting is the way to go). But with jam, you can have apricots all year round.

This year, I set out to make the apricot jam from Christine Ferber's book of recipes. At about every stage in making this jam, I was sure I had failed and ruined the whole batch. First my apricots discolored in the fridge, then they wouldn't peel, then the jam seemed too runny. But I just kept on going, and what I got was about the best jam I have ever made. Seriously.

DSC_0843DSC_1046

Though the recipe seems like it has many steps, it is actually a very quick jam to make. If you thought making jam was all about stewing fruit for hours, Mme Ferber is here to change your mind. By keeping the cooking time relatively short, the apricots stay bright and fresh tasting. I've added additional tips and pointers in the recipe based on my experience. File this away for next apricot season and I promise it will be worth the effort. As the French would say, bon courage!

DSC_1052

Apricot Jam 
At several points in this recipe you will probably think you've gone terribly wrong. Just keep going! Trust your instincts, and it will come out great in the end. If your apricots discolor when resting in the fridge don't worry, the boiling with take away any brown edges. Though the recipe seems long and involved it really only take a total of about 30 minutes of kitchen time. Makes about 4 jars.

1 kilo firm-ripe apricots (2.2 pounds)
700 grams  sugar (24 5/8 ounces, or 3 cups plus 2 tbl)
175 grams water (6 1/8 ounces, 3/4 cup)
juice of 1 large lemon, or 1 1/2 regular-sized lemons

1. Halve and pit the apricots, placing apricot halves in a large, preferably ceramic, bowl. Place the bowl on your scale, set scale to zero, and then add your sugar and water using the weight measurements on your scale. Add the lemon juice, stir everything to combine. Cover the bowl with parchment paper, a towel, or plastic wrap, and set in the fridge for 6-8 hours.
2. Pour all the contents of the bowl into a pan and bring to a simmer.  When the mixture is fully simmering, let simmer for about 5 minutes, then turn off the heat and pour the mixture back into the ceramic bowl. Cover again and set in the fridge overnight.
3. Place a small plate in the freezer. Strain the apricot mixture, emptying the juices into a pan. If your apricots skins are loose, peel them off. If your apricot skins are not loose, do not try to kill yourself trying to peel them off and simply proceed with the skins on. Your jam will be a bit more rustic but really it's barely noticeable.
4. Bring the juice in the pan to a boil. Skim off any foam that accumulates on the top of the liquid. Boil the juice for a good 8-10 minutes, or until it is thickened and reaches 221 F (105 C) on a candy thermometer. (Since you may have more or less liquid depending on the juiciness of your apricots, the timing can vary, so a thermometer is a good gauge).
5. Add in the apricots and boil on high for another 3-5 minutes, continuing to skim. It will seem like you have too much liquid to apricot ratio, but don't worry. The apricots should start to fall apart around the edges and gel with the liquid, but should overall retain their shape. You can test the jam by adding a spoonful to your frozen plate and seeing if it gels up quickly*. Otherwise, about a five minute boil should do it. Ladle into clean jam jars and seal as desired.

* For more on the freezer jam test see here

For labane and apricot roll-ups, pictured below, take a sheet of lavash, pita, marquq, or other flat bread. Spread the bread with some labane, strained yogurt, or just some thick Greek yogurt. Spread with apricot jam, roll-up, and this is a great breakfast on the go. You can make them ahead of time too.
DSC_1053

11 August 2013

Freekia Salad with Caramelized Onions, Figs, Cheese, and Pine Nuts

DSC_1027

It is August, and I'm chasing memories again. I grew up spending August at the beach, crinkling my toes in the sand, lying on beach towels, plowing through one novel after another, riding a bike with an ice cream cone in one hand, eating corn on the cob, and no August since has ever quite lived up to those expectations. My mother used to say that a good day was when you got to spend all day in your bathing suit. I agree. She was a swimmer, and though I did not inherit her aqueous skills, I share a need to be close to, in, and around water, especially in the summer.

Paul, on the other hand, hates the beach. He cringes at each grain of sand that sticks to him, swelters in the heat, and crouches miserably under the shade of an umbrella until I will finally release him from that sandy, salty, sweaty prison. Don't get me wrong, a crowded beach can be a terrible, horrible thing. Recently, on vacation in France, we found refuge in the barrier islands, taking the ferry out in the morning with our beach towels and sunscreen and books, finding a quiet beach with enough shade for Paul, a few other French families dotting the sand.

DSC_1030

Still, it has me thinking about how to find some solution for my lust for the August beach vacation, which admittedly is tied to a certain nostalgia for the freedom of childhood summers. Buy a beach house, even though we will live abroad for the foreseeable future? That seems extravagant (and totally out of our budget, but I can dream right?). And while Paul will never share my love of the coolness of your skin after you take off your damp bathing suit at the end of the day, can I find a place where he can love the beach too?

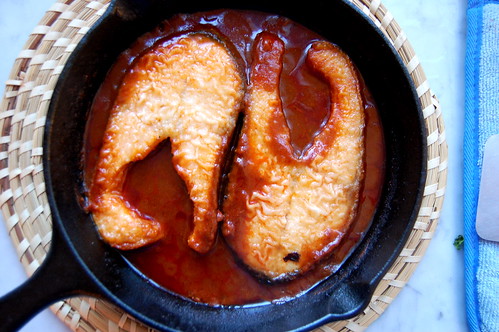
If I had a place on the beach, this is the sort of thing I'd make. It's from a new cookbook that I'd probably bring to the beach with me too, Salma Hage's "
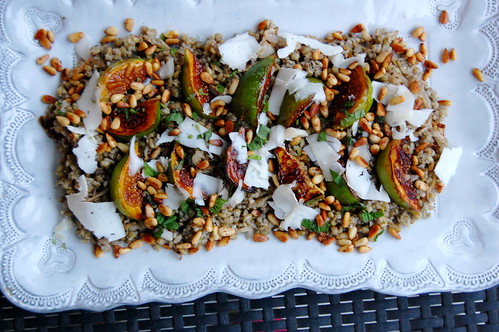
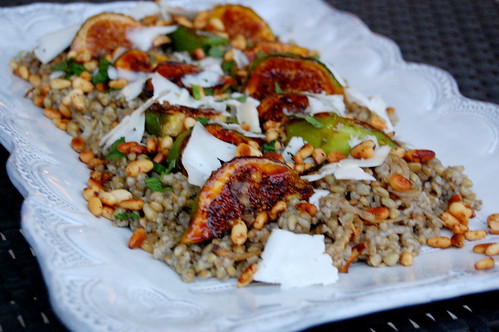
The Lebanese Kitchen." Maybe I'd serve this salad alongside a grilled protein, but it's pretty great on it's own. You really can't substitute for the smoky chewiness of freekia, a type of green wheat, but you can order it online (I've been using the same bag I got in Jordan for about 2 years). You cook the freekia with some spices while you also caramelize some onions. You combine those, and then you sear some figs so they have this great caramelized edge, and you toss some mint, a sharp cheese like feta or goat cheese, and pine nuts on top. There's a few steps, but you only need two pans and a good knife, because no one wants to be doing lots of dishes when you're on vacation.

DSC_1026

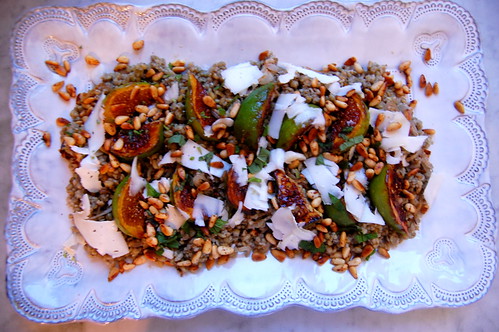
Freekia Salad with Caramelized Onions, Figs, Goat Cheese, and Pine Nuts
The original recipe called for a mixture of fresh and dried figs, but we had plenty of fresh figs. If they're not in season in your area, dried figs could work, though I haven't tried it.

2 white onions, thinly sliced
1 cup freekia (cracked green wheat)*
1 tablespoon butter
1/2 teaspoon allspice
1 teaspoon cinnamon
salt, olive oil
4-6 large figs, quartered
3 tablespoons sugar
1 sprig of mint, leaves removed and sliced
100 grams /3.5 ounces (or to taste) of a sharp cheese like feta, soft or hard goat cheese, crumbled or shaved
1/4 cup pine nuts

1. In a large saute pan heat a good glug of olive oil. Add the sliced onions, pinch of salt, and cook over medium-low heat, stirring occasionally, until the onions are deeply browned and caramelized, about 40-45 minutes. 
2. Meanwhile, in a medium sized pot over medium heat melt the butter. Add the freekia, cinnamon, and allspice and stir, toasting the grain for 2-3 minutes. Add 2 1/2 cups of water and 2 bing pinches of salt. Bring the water to a simmer, cover pot and turn heat to low. Cook until water is absorbed and grains are puffed and tender, about 30 minutes.
3. Place the caramelized onions into a serving bowl when the are done cooking (reserve the pan). When the freekia is done let it cool slightly, then scoop it into the serving bowl and add more olive oil and salt to taste, and toss everything to combine.
4. Place the sugar in a shallow bowl. Heat up the same pan that you used for the onions (rinse it out if it's really grungy) with just a smidge of olive oil coating the bottom, over medium-high heat. Dip one side of a cut fig piece into the sugar, then place it sugar-side down into the saute pan, adding as many figs as will fit at once. As your figs become caramelized and well browned on the one side, transfer them to your serving dish.
5. Again in the same pan (it will have the sugar bits stuck to it and that's okay), add in the pine nuts and toast briefly, tossing them around until they're lightly golden. Add the pine nuts to your serving dish. Now you can finally put your pan in the sink!
6. Sprinkle the mint and cheese over your salad and serve warm or at room temperature.

* Freekia (frik/freekh/frikiah) can be ordered online from Kalustyans here

You might also like: Freekia with Fava, Preserved Lemon, and Almonds

06 August 2013

Fresh Kishk with Herbs

DSC_1034

Kishk (kishik/kashuk) is one of those things that I think only really hard-core Middle Eastern food enthusiasts are into. And yes, you should take that as a challenge. But honestly, kishk really isn't that hard to love, at least not in the form I'm giving you today.

But first, let's get some basics down. Kishk is a mixture of yogurt and bulgur that can be served in a mezze spread. Easy, right? It can be found all over the Levant, also with names like jameed and tarhana, but each version is a little different, so I'm going to stick to the Syrian version today. Second of all, there's fresh kishk and dried kishk. Fresh kishk is, again, a simple mixture of yogurt and bulgur. In my local cheese shop in Damascus they always had at least three bins of different kinds of fresh kishk - one newly made that day, one a day old, and one two days old. Syrians reaaalllly love kishk. As it ages is becomes drier and crumblier. For the dried version kishk is aged in the sun until very dry, then it's ground to a powder and stored until winter, when it's rehydrated into a soup. Dried kishk is also used in a topping for mana'ish, a kind of pizza.

Most people immediately think of the dried version of kishk, but I think the fresh version is too often overlooked. It's like your favorite labne spread at the mezze table, only bulked up with a little texture. It's often served with a nice refreshing salad on top, full of crunchy cucumbers, mint, and scallions. We make simple mezze at home often just for dinner, or it's nice to serve to guests before a dinner party. Then you too can tell them all you know about kishk!

 DSC_1032

Fresh Kishk with Herbs

For the kishk:
300 grams (.6 lbs) labne (make you own here)
2 tablespoons very fine grade bulgur (do not use thick whole-grain type bulgur)
pinch salt

For the salad:
half a small cucumber, large seeds removed and diced
1 sprig of mint, leaves sliced
1 scallion, light and dark green parts only, sliced on the bias
2 tablespoons olive oil
1 tablespoon lemon juice
salt, to taste
pinch of Aleppo pepper or red pepper flakes

1. Combine the labne, bulgur, and salt. Let sit at least one hour to soften (about 2 hours is my preferred waiting time). You can prepare this as far ahead as the day before, leaving it in the fridge, but be aware you may have to add more labne to thin the texture.
2. Combine all the salad ingredients and mix to taste.
3. Spoon the kishk into a serving platter. Sprinkle the salad over top. Serve.