15 August 2015

Pea and Mint Tart

DSC_1206
 I'll admit, these last few weeks have me in some sort of crabby baby-land funk. It's 117 degrees outside, I'm six months pregnant, and I live in Egypt. What I wouldn't give to be able to wear a pair of shorts right now, or breathe clean air, or see a proper beach, I can't even tell you. We are also over due for a vacation -- we've had a few side trips here and there, most of them packed with things like long flights or freezing cold walks across England -- but I haven't had a proper relax and hang-out vacation since last summer (I even worked over Christmas) and I'm starting to feel the effects. But shining like a big bright light on the horizon: three weeks off in September to hang out at home in Chicago, get the house ready for baby, and see a couple dear friends get married. I can't wait!

My cooking has been in a similar sort of funk. There have been a lot of taco nights, ie the best way to use up odds and ends in the fridge, pasta with pesto, and snacking on Egyptian mangos with vanilla ice cream. So far we've counted at least five varieties of local mangos. Maybe I should do a taste test of mangos for the blog? That might be fun.

Still, there have been some highlights: a sweet friend in DC telling me she has our due date on her calendar, the traffic cops that always stop traffic immediately for me as I approach an intersection. A colleague of mine kindly told me that buying baby things is one of the most exciting things in the world, and that it sucks that the mail system here is so frustrating. (I was complaining about the mail we get from the U.S., which only comes about once randomly in a month, and it can take up to 6 weeks for things to arrive.) I'm making curtains for the nursery and a little blanket. Despite my cooking funk, I made zucchini cupcakes with cream cheese frosting for the office. Paul has been awesome, finding a local place for prenatal massage, or pointing me towards a good yoga video, agreeing to paint the super intricate stencils I want on the nursery wall, and smartly ignoring me when I freak out about which bassinet we should get.

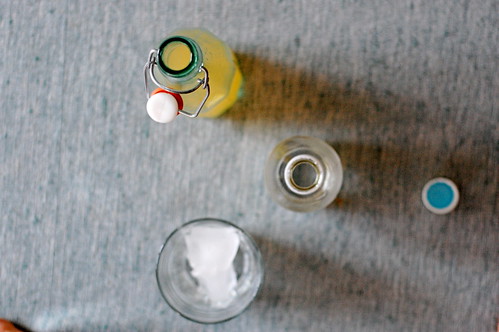
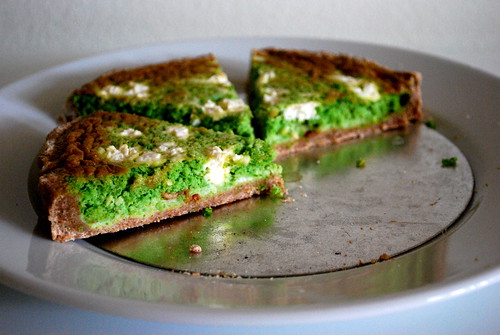
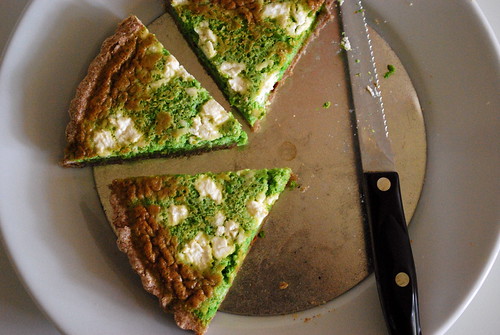
I've been trying to pack healthy lunches for myself, since one can't live on koshary alone and I already have the Lebanese place on speed dial. This pea and mint tart was something I came up with that could be healthy and portable, and also use up the half bag of peas that are always lurking in the freezer. It's vibrantly green and delicate in texture and keeps nicely for a few days in the fridge.

Pregnancy corner: I don't want this blog to be taken over by pregnancy stuff, but a couple of you wrote to me saying you are also pregnant (congrats!) and I thought I'd keep this little bottom corner for things I've found useful. Right now, this prenatal yoga video is great -- I've been surprised at how many are super boring and I even found a few online that the yoga instructor in me thought were unsafe. Also, flowy Anthropologie dresses are great for maternity clothes that aren't actually maternity. I started making a list of recipes to make ahead and freeze over here. Besides the usual casserole type things, I'm thinking things like little baked meat pies with roasted tomato soup are both freezer friendly, healthy, and make one-hand meals.

DSC_1205

Pea and Mint Tart
tart crust for a 10" tart pan*
2 cups peas
3 eggs
2 tablespoons heavy cream
leaves from 1 sprig of mint
1/4 cup grated parmesan
2 ounces goat cheese
2 strips of bacon, cooked and crumbled
salt, pepper

1. Preheat oven to 400F. Prepare and roll out tart dough and fit it into the pan. Refrigerate tart dough.
2. Place peas, eggs, cream into the bowl of a food processor. Process until well combined. Season well with salt and pepper, and add the cream, mint and parmesan. Pulse a few time to combine the mixture and break up the mint slightly.
3. Place tart crust on a baking sheet. Crumble the bacon in the bottom of the tart crust. Pour the filling in. Crumble the goat cheese over top. 
4. Bake for 35-45 minutes, or until top is lightly browned. Let cool slightly before serving.


* I used this recipe, doubled, without the vege oil or sugar and with half whole wheat flour.

23 July 2015

Baking with Einkorn Flour + Homemade Pizza

photo 2-2
If you've been reading here for a while then you'll know that I like to experiment in baking with different flours. That sometimes results in things like amaranth cookies, rye pie crusts, kamut cake, or semolina cakes, and also a myriad of failures with teff. Recently, I spied some einkorn flour online and did a bit of research about it and decided to experiment a bit with it. So of course I ordered about 10 pounds!

photo 1-2

Einkorn berries, and the resulting flour, are essentially a wild wheat. That is, they are a cousin to the same grain your regular all purpose flour is made with, so they're not gluten free or anything, but they have not been cultivated and developed for years like a lot of modern commercial wheat and are supposedly more dense in protein and nutrients. I'm not an expert, but you can read some more here and here. Frankly, for all I know einkorn could be some marketing hoax, but since we make pretty much all of our own baked goods in house, I'm very conscious of just how much flour we consume and I'm always looking for more ways to get variety in our diet.

Einkorn is easier to work with than some exotic flours since it is not unsimilar to regular flour. The key difference is that einkorn is a much softer flour, so it needs less liquid. The texture is a little like cake flour. One of the advantages to this is that you can combine einkorn flour with stronger flours, like dark rye or whole wheat without the resulting dough being heavy or coarse. In the above photo, you can see the Ottolenghi kranz cakes (aka chocolate babka) where I made the dough with half rye/half einkorn mix, which came out wonderfully.

Another thing I really like is making pizza with part einkorn flour. In my quest to find appealing foods during pregnancy, I thought this was a great opportunity to work on my homemade pizza technique. My resulting pizza is based off a recipe from theKitchn, tweaked to work with a part einkorn flour mixture and increased in volume. As homemade pizza goes, we think it's pretty awesome. Some toppings we've enjoyed include roasted kale and mozzarella, salami and red pepper, homemade pesto, and fig and blue cheese. Have any of you tried einkorn flour yet? Let me know!

photo 3-1
Homemade Pizza
Makes 2 large or 3 medium pizzas. I use parchment paper to transfer my pizzas to the oven. This makes it very easy, but keep in mind that the paper does start to brown/burn around the edges while your pizza is baking. It won't affect the pizza or flavor, but it just looks a little disconcerting. When the pizza is done, it slides right off the parchment and you can just discard it.

1 1/4 teaspoons instant yeast (such as SAF)
1 1/2 cups einkorn flour, plus more for kneading and rolling
1 1/2 cups whole wheat flour (or all purpose flour)
1 1/2 teaspoons salt
3/4 cup warm water, plus more as needed
toppings of choice
parchment paper

1. Place the yeast in a large bowl. Add the salt and the flours and stir with a rubber spatula to combine. Make a well in center of the flour, add in the water, and then gently mix the mixture by stirring with the rubber spatula. If the mixture is dry, add more water, 1 tablespoon at a time, it should not need more than 4 tablespoons additional liquid. (It probably won't be too wet, but if it is, you can add additional einkorn flour.) Once the mixture has come together, turn it onto a surface lightly floured with einkorn flour and knead the mixture until it forms a smooth dough ball. Lightly coat the ball with olive oil, place it back in the bowl, and cover with a damp towel or plastic wrap. Let rise until doubled, about 70-90 minutes.
2. Preheat oven as high as it will go. Place a pizza stone in the oven if using. Prep toppings.
3. Press down the dough and divide it into 2 or 3 pieces, depending on how many pizzas you want. On the same lightly floured surface, press out your dough into a disk and then lay the dough on a piece of parchment paper. Repeat with remaining dough. Top dough with desired toppings.
4. Slide a baking sheet under the parchment paper, transport it to the oven, then slide the pizza on parchment paper onto the pizza stone. Bake pizza for 8-11 minutes, until crust is lightly browned and cheese is bubbling. Remove pizza, slide pizza onto cutting board, discard parchment. Repeat with remaining pizzas.

16 July 2015

Lime Cordial + News!


DSC_0107
Whew, it really is the dog days of summer around here, if you're allowed to say that when it isn't even August yet. It's hot and muggy out and it seems like everyone is just sitting around waiting for the last few hours of Ramadan to end. Oh wait, didn't I say last time that I something to share today? I hinted at the fact that I'd been hit with more of my fair share of the Egyptian stomach revenge these past few months, which is certainly true, but I've also been growing this tiny person inside me, who seems to have a lot of opinions about food, most of which seem to be negative.

(And, yes, if you found that paragraph at all ambiguous, we are expecting a baby the first week of December! One of you commenters even guessed it last time, you spoil sports.) I could not be more thrilled, but I've also been faced, for the first time in my life, with a complete and total disinterest in food. It was surprising to me how little food, nevermind even walking into the kitchen, became unappealing to me. Just finding something palatable became a challenge, and there were a few weeks where I had a repeated "sad pregnancy dinner" of peanut butter toast and a sliced apple.

DSC_0105

To make matters worse, just when I rounded the end of the first trimester, I was hit by a bad virus followed by an Egyptian stomach bug. I am extraordinarily lucky that my mother-in-law is an OB and so even though I was sick and half way around the world from home I was always in good hands. For a while there my concern become just eating anything, so a lot of juices, smoothies, and milkshakes were on the menu. I'm still working on perfecting my avocado, yogurt and honey smoothie, stay tuned.

Luckily, as I round the corner into my fifth month (!!!!) I'm feeling great and even back to making dinner again. I can't tell you how good that feels. For the first time this week a few people in our building even noticed my belly, prompting quite a few "Allah ynowar" and "from the waters of the Nile" blessings and jokes.

DSC_0129

I have so much to say about pregnancy, especially as someone who's been a dancer/pilates/yoga person for their entire life, and even more to say about maternity and workplace issues around pregnancy and all of that. I did want to add that I also WALKED ACROSS ENGLAND in my eighth week of pregnancy, a fact that I will probably be telling people for the rest of my life with great pride. It was actually great fun, if exhausting, and I was lucky to have two great moms by my side.

When I was still in my first trimester and trying to find more exciting ways to stay hydrated I remembered the lemon cordial that we used to make in the summer in Damascus to drink mixed with tonic water. I can still see the glass bottle of cordial and the Arabic Schweppes logo sitting out on the porch now. I made it instead with Egyptian desert limes, which are like American key limes. It's wonderfully tart-sweet and refreshing when it's hot out. Just this week a made another batch with lemon and ginger, in an effort to tamp down some occasional persistent nausea.

Before I go, while I'm no pregnancy expert, I thought I'd share a few things that have been helpful to me. This yoga video is just right, gentle enough for your most tiring days, or paired with other weight exercises on other days. Preferably while wearing the most comfortable top ever. I had lists from several friends from their baby registries, but this one from Cup of Jo is great. Also advice for dads, and a sommelier on pregnancy (even if you aren't drinking, her tips about taste bud changes were interesting).

DSC_0125


Lime Cordial
This recipe makes enough to last a long time, or enough for one giant summer cocktail party.

2 cups sugar
2 cups freshly squeezed lime juice
1 cup water

1. Combine all ingredients in a saucepan. Bring the mixture to a gentle simmer. Simmer for 15-20 minutes until thickened slightly. Pour into clean jars and store in the fridge.
2. Serve a splash of cordial in a glass of sparkling water or tonic water, or use for cocktails. I imagine it would make an excellent variation on gin and tonic.

Variation: For lemon ginger cordial, use lemon juice plus a 2-inch knob of ginger, peeled and chopped. Strain out the ginger before bottling.

05 July 2015

Seedlicious Bread


Hi there! I can't believe it's been so long since we've seen each other! What have you been up to? How is your summer going? We have SO MUCH to talk about.

The life of an expat is full of entrances and exits. People coming and going, moving on to work assignments in other countries, fleeing the heat of whatever tropical or desert location we've been assigned to to go back home to the cool winds of England or Colorado for the summer. But I'm still here, plugging away, enjoying the Ramadan lights and crazy nights of Cairo.

This blog though, has been an empty space for a while, and I'm going to dive more deeply into the reason for that in my next post. Suffice it to say, I've been going through a few stomach issues lately that have taken the wind completely out of my cooking sails. I've also done quite a bit of traveling that has kept me out of the kitchen: to England and Scotland, to spend a week walking Hadrian's Wall with some friends, to Vienna for wine tasting and the great Egon Schiele tour, and to watch my husband celebrity spot cellists (like these guys) on the street. And finally we had a whirlwind tour to the States to see some dear friends get married in their backyard and spend a few days in our house in Chicago doing fun things like going to the dentist and doing some home repairs.


As usual, our suitcase on our return flight from America looked like a bizarre hodgepodge that I'm sure TSA got a good laugh out of. We had: a small kilim carpet that I thought would look better in the Cairo apartment, a metal file (for my husband's cello endpin), a few bottles of wine, bags of millet and flax seed, Angostura bitters, and some strange odds and ends I wanted for the apartment here like a small metal coat rack and a framed picture. Also, a whole lotta bubble wrap.

The millet and flax were mainly because I wanted to make an imitation of a bread they sell at Whole Foods called seedlicious bread (actually it's called seeduction, but I always get it mixed up and call it seedlicious). Cairo bread is mainly centered around the local bran-coated flatbread (aish) and a few other flatbreads and spongy sandwich breads. Darker breads are very difficult to find (just like in Algiers) and I'm already in the habit of making my own. (For any Cairenes, the Bread Basket, a German bakery in Ma'adi, does make good laugen rolls and a dark bread called dinkel that I like, they will also deliver to other parts of the city.)

So, I looked up a recipe for imitation seedlicious bread, ignored about half of the directions, and voila. It's a pretty easy bread to make, and since I make my own granola regularly, I always have a bunch of seeds and grains on hand anyway. My goal is to back to regular posting from here on out, so let's talk soon, okay?!


Seedlicious Bread
This is one of the better uses of millet that I know of, an otherwise dull grain in my opinion. I liked the combination of whole wheat and rye, but you could play around with other flours or use all of one or the other if you prefer.

1 1/4 cups warm water
2 tablespoons molasses (I used date molasses because it's easiest to get here)
2 tablespoons honey
1 package active dry yeast or 1 tablespoon instant yeast (like SAF)
1 cup whole all purpose flour
1 cup whole wheat flour
1 cup dark rye flour, plus more for sprinkling
1 1/2 teaspoons salt
2 tablespoons sunflower seeds
1 tablespoon poppy seeds
1 tablespoon flax seeds
2 tablespoons millet
vegetable oil

1. Place the warm water, molasses, and honey in the bowl and sprinkle over the yeast. Wait a few minutes for the yeast to bloom. Meanwhile, combine the three flours and the salt in a bowl and mix to combine. Add the flour mixture to the water and stir with a wooden spoon to combine. The dough should be a little more damp than a normal bread dough, but if it looks like it is too damp to knead, then sprinkle in some more flour. Add all the seeds and millet to the bowl, and begin to knead the bread dough in the bowl. Knead until the  seeds are well worked into the dough and the dough becomes smoother, adding flour as needed, about 5 minutes. Form the dough into a round, coat the round with vegetable oil to prevent sticking. Cover the bowl with plastic wrap or a damp towel and let rise for about 1 hour. It will not fully double in volume, but it should grow by about 2/3rds.
2. Preheat oven to 375F. Line a baking sheet with parchment paper or grease a loaf pan. Press down the dough, transfer it to the baking sheet or pan, gently patting it into shape. Again cover with plastic wrap or a damp towel and let the bread rise until nearly doubled, about another 40 minutes. Bake the bread until darkened on the outside and it sounds hollow when tapped on the bottom, 40-45 minutes. Cool on a rack. Makes good toast.

09 May 2015

Josephine's Spicy Fish (Samke Harra)


Ah-he-he-hem. Hello there. Did the month of April just pass by completely unobserved on this blog? Well, let's not dwell on that shall we? Hopefully later we can catch up about trips to Vienna and lost luggage and stomach bugs and trekking in England and the five days of nice weather in Cairo before it turned hot. But for now, let's talk about delicious spicy fish, okay? Deal? Deal.


I have had this recipe for Lebanese spicy fish, which was published in Lucky Peach back in 2013, and comes from the renowned Lebanese establishment Tawlet, tacked up on our fridge since, um, 2013. It's 2015 (sometimes I need a reminder). That means this recipe was stuck up on our fridge in Algiers, and then stuck on our fridge in Chicago, and then stuck on our fridge...... you get the idea.

Back in December I had the great pleasure of eating at Tawlet, which is a food cooperative in Beirut aimed at preserving and sharing Lebanon's food traditions, and I can tell you it lived up to expectations. There was natef! arak! a tasting of local wines! If you go, I can recommend the Armenian menu and any day they serve kibbe nayyeh, which is raw minced beef.

But, I still needed to make the spicy fish recipe, which comes from Tawlet cook Josephine Ghaleb, a Tripoli native, a town famous for their seafood recipes. I've made samke harra many times, and almost all recipes call for roasting or grilling some fish, and then topping the fillet with the tahini-chili sauce and toasted nuts. What intrigued me about this recipe was that Jospehine, breaks up the fish and mixes it with the cilantro-lemon-onion sauce before the tahini topping. This, my friends, is the genius of this recipe. Each bit of fish is coated with lemon and cilantro, spicy chile, and sweet onion. There's no "fishy-ness" to the dish at all, and I imagine it would be a good dish for even the most fish averse. The creamy tahini and crunchy nuts, lots of them, add just the right amount of texture. Worth the wait? You bet. (But I promise to be back with more before the month of July!)


Josephine's Spicy Fish (Samke Harra)
Adapted from Tawlet via Lucky Peach.

2 fillets sea bass or similar white fish (about 1 1/2 to 2 pounds)
1 cup finely diced yellow onion
1 green bell pepper, finely diced
1 jalapeno chile, seeds removed and finely diced
2 whole bunches cilantro, washed and dried
1/4 cup olive oil
2 lemons
1/2 cup tahini
1 cup mixed pine nuts and chopped walnuts
salt, white pepper

1. Preheat oven to 350F. Place the fish fillets on a baking sheet lined with foil. Rub a bit of olive oil over the fillets and sprinkle liberally with salt and with a pinch of white pepper. Bake the fish fillets for about 15 minutes, or until firm and cooked through. Set aside the fish but turn the oven up to broil.
2. Meanwhile, juice the lemons, removing any seeds. Slice the cilantro leaves (it's okay to get some of the stems in there) into a big pile. Place the tahini in a bowl with one tablespoon lemon juice and two pinches of salt and stir together. Add enough water (1-3 tablespoons) to the tahini to make it a thick pourable consistency.
3. Heat the 1/4 cup olive oil in a saute pan. Add the onions, bell pepper, and jalapeno and cook gently until the onions are translucent and everything is soft. Remove from the heat.
4. Add the remaining lemon juice to the onion mixture, then gently fold in the cilantro. Gently break up the fish fillets into large pieces, discarding any skin or bones, then place the fish fillets into the pan with the onion-lemon mixture, and fold everything very gently to coat the fish with the sauce.
5. Pile the fish mixture onto a serving platter. Pour the tahini over the whole thing. Place the walnuts and pine nuts on a baking and slide under the broiler, watching closely, for only about a minute until well toasted. Top the fish mixture with the nuts and serve immediately.

27 March 2015

Orange-Scented Cream Triangles (Sha'abiyat bil Portuqal)

photo
One of the "problems" of living with someone who conducts food research as a serious hobby is that we almost never make anything more than twice. Oh that chickpea curry thing you really liked? Don't worry, I might make it again in about five years. Oh you wanted pizza for dinner? But I've been experimenting with curing my own basterma and I thought I'd try this new vegetable I've never heard of that I found at the market. Oh you didn't want carrot soup for the third time this week? But I'm perfecting the recipe! Welcome to life with yours truly.

Which means that poor Paul has been asking me to make cream-filled baklava (baklava muhallabiya) again for about the last 4 years. Searching for something to bring to my office one day, I finally caved and picked up the ingredients at the market. But of course my mind, which seems to never stop churning over different permutations of what I can make with things in the refrigerator, remembered that another type of cream-filled baklava, called sha'abiyat (شعبيات), is made with the same ingredients as baklava muhallabiya. Like the baklava, sha'abiyat are a specialty of Syria, in particular popular in Aleppo, and are often found at Ramadan. Sha'abiyat are triangles of baklava filled with a simple cream filling and baked and then covered in syrup.

In somewhat of a comedy of errors (although sometimes I think living in Egypt in general is a comedy of errors) I went to three different grocery stores to try and find orange blossom water, which was sold out or absent at all three. I ended up making the baklava syrup with fresh orange zest, and everyone loved it, so much so that when I made the same recipe the following week to re-test it, I stuck with the orange water. It adds a brightness and clean taste that I find is so often missing from baklava.

Before I let you go, let's have a quick review of baklava technique. (1) Baklava is not that hard to make. (2) Use some form of clarified butter, the water in un-clarified butter makes the baklava have burnt spots. (3) Cold syrup + hot baklava from the oven = crispy baklava. (4) Fresh baklava is infinitely better than pre-packed baklava.

Final food-nerd notes:
  • Lonely photo of sha'abiyat taken on the car seat next to me on the commute to work, because living in Egypt means endless time commuting and not enough time for photos.
  • Sha'abiyat are also sometimes made with a softer homemade dough instead of fillo dough, and are sometimes made with a semolina custard instead of clotted cream. (See picture here.)
  • Like the idea of having more routine in your dinner life? I loved Shauna's post about that here.
  • A rare piece of good news from Syria: the Icarda genebank is preserving seeds for traditional food stuffs and plants.
  • Poor Paul is still waiting for his baklava muhallabiya.

Orange-Scented Cream Triangles (Sha'abiyat bil Portuqal)
Using only two fillo sheets will initially seem like a thin dough, but trust me, once you've done the folding of the triangles it's just the right amount. Ghee can be purchased at most grocery stores these days, samneh is the Middle Eastern equivalent, and can be found at Middle Eastern shops. If you can get your hands on clotted cream it is worth it, as it makes this recipe both faster and tastier.

1 box fillo dough, fully defrosted
1 1/2 cups samneh, ghee, or clarified butter
filling:
1 pint clotted cream or 'ashta, if you can get it, or heavy cream
1 tablespoon cornstarch, if using heavy cream
4 tablespoons (1/4 cup) honey
zest of half an orange, or 1 mandarin
1/4 teaspoon salt
syrup:
2 cups sugar
1 cup water
zest of half an orange, or 1 mandarin, plus 1 tablespoon of juice

1. Make the syrup: Place the sugar and water together in the saucepan and place over medium heat. Heat the mixture, stirring occasionally, until the mixture starts to bubble and the sugar is dissolved. Remove the pan from the heat, then grate the orange zest directly into the syrup and add the tablespoon of juice. Set aside and let syrup cool completely. (This can be done several days ahead and kept in a sealed jar in the fridge.)
2. Make the filling: If using clotted cream simply stir together the cream, honey, zest and salt. If using heavy cream, place the cream and flour in a saucepan and heat over medium-low heat, stirring constantly, until the mixture is thick and bubbly slightly. Remove the pan from the heat and add the zest, honey, and salt. Taste for sweetness, it may need a touch more honey. Set aside to cool. (This can be done one day ahead and stored in the fridge.)
3. Make the baklava: Preheat the oven to 350F. Get out a large rectangular rimmed baking tray. Melt your samneh or butter in a bowl and have a pastry brush ready.
4. Remove the fillo dough from the box, place it on the counter with plastic sheets both underneath and on top of the dough. Place a damp kitchen towel on top of the top plastic sheet over the fillo dough. Working either directly on your counter, or on a large marble board, lightly butter your counter or board. Place one sheet of fillo dough down, lightly butter it with you pastry brush, then place another sheet of fillo on top and lightly butter that sheet. Slice the fillo dough into four strips lengthwise (so you''ll make 3 cuts to create 4 strips). Place a spoonful of the cream filling at the top corner of one strip of fillo, then fold the fillo over on itself in a triangle, and keep folding up, as if you were folding a flag, until the whole fillo strip is used up. Use a bit of butter the secure the ends of the fillo strip to the triangle. Place on the baking sheet seam-side down. Continue with the remaining strips, then continue making triangles until you've used up all your fillo dough. Crowd the triangles into the pan as close together as necessary.
5. Brush the tops of the triangles with a bit more butter. Bake the triangles until a medium brown (not too dark, not too light), about 30-35 minutes.
6. Remove from the oven and immediately pour 1 cup of cold syrup over the hot triangles. Let absorb for 10 minutes. Then drizzle another 1/2 cup of syrup over the triangles. Let the triangles cool completely. Serve with additional syrup on the side, for people to add as they like.

Want more like this? Try the (easy!) regular baklava recipe.


20 March 2015

Nile Nachos

DSC_0098
Since my last post on here was all into nitty-gritty food philosophies and things otherwise known as deep thoughts, I thought we should do something fun and irreverent for a change. Sound good? I thought so. And so was born the idea for a Middle Eastern fetteh meets Mexican-American snack food love child: the Nile Nacho.
DSC_0094
I know, I know, sacrilege you say! But this idea actually came about because nachos, a food I almost never eat, are surprisingly popular in Cairo. One of our favorite local restaurants, Tabla Luna, does a rendition of them so good it could transform even the most nacho-averse eater. And it got me thinking, layering tasty gooey things with tortilla chips isn't really that far from layering tasty things with pita chips, right? Plus, putting tahini on said pita chips can only make them better. Then I started thinking about substituting the usual black beans from some spicy roasted chickpeas, and how pickled jalapenos are surprisingly common in Cairo, and the whole idea just made sense.

The Nile Nacho consists of pita triangles layered with a tahini-yogurt sauce, spicy roast chickpeas, smashed chickpeas, tomatoes, radishes, herbs, and sumac. If you think it's heretical to have nachos without cheese, then by all means add some feta or Middle Eastern-style string cheese (I'm lactose intolerant, and wanted to save myself the stomach cramps). These are surprisingly delicious, fun, and a great way to introduce people to new ingredients like tahini and sumac in a familiar format. Also: NILE NACHOS!

DSC_0102

Nile Nachos
When I made these the first time, I roasted the pita triangles in the oven. While the nachos were still delicious, the pita got soggy, so I switched to frying the pita triangles so they stay crispy. The roasted chickpeas are so good they are worth making on their own. I like to use canned chickpeas here since they are crispier than freshly cooked from scratch chickpeas. Whatever you do, rinse and dry your chickpeas before using. Feel free to experiment with your own toppings, my friend Nick recommended some crispy roast schwarma meat would be a good addition, and I agree.

3 large thin pita breads, preferably stale, cut into triangles
neutral oil for frying
1 1/2 cups cooked chickpeas (1 can)
2 tablespoons tahini
1 lemon
1 teaspoon cumin
1/4 teaspoon paprika
1 tomato, seeds removed and discarded, flesh cubed
2 radishes, halved and sliced
4 sprigs mint, leaves sliced
optional: 1 pickled chili or jalapeno, sliced (or you could use chile flakes)
optional: creamy feta cheese or Middle Eastern string cheese
sumac, for serving

sauce:
1 cup thick Greek-style yogurt
3 tablespoons tahini
1 teaspoon salt

1. Prep all your ingredients. Set up a draining/cooling rack over some paper towels on your counter.
2. Heat about 1-2 inches of oil in a wide deep-sided skillet or saute pan. When the oil is hot (test by splashing a teeny drizzle of water in it) add a few of your pita triangles. Cook the triangles, turning frequently, until they are lightly browned and crisp. Remove with a slotted spoon or spider to the cooling rack and repeat until you've fried all your pita.
3. Preheat your broiler on high. Divide your chickpeas in half, place half in a small bowl. Place the other half on a baking sheet, add the cumin, paprika, two pinches of salt and a glug of olive oil and roll everything around to coat. Place the chickpeas under the broiler. Broil the chickpeas, stirring occasionally, until they are deep brown and crispy on the outside, about 10-15 minutes. When done, switch the oven to 350F.
4. Meanwhile, add the 2 tablespoons tahini and the juice from the lemon, along with a pinch of salt, to the chickpeas in the bowl. Using a fork or a pestle, smash up the remaining chickpeas into a rough smash.
5. Mix together the sauce ingredients. Add water, 1 tablespoon at a time, until the sauce is a thick but pourable consistency. If you accidentally make it too watery, add more tahini.
6. Place half the pita triangles on an oven-proof platter. Dab half the chickpea smash over the pita, sprinkle half the roast chickpeas and half the tomato over top. Add a few of the radishes, mint, and chile and cheese if using. Drizzle the whole thing with some of the yogurt sauce. Repeat layering the pita chips, toppings, and yogurt sauce. Set aside some of the mint and radishes for the final serving. Sprinkle sumac over the whole thing. Slide the dish into the oven and let heat just for 5-8 minutes or so, you want to heat the dish not cook it. Remove from the oven, finish with the mint and radishes and serve warm.

Want more irreverent untraditional takes on Middle Eastern food? Try the brussel sprout fattoush.

07 March 2015

Filed Under Deep Thoughts

 photo 1
I made a comment on Instagram recently about a cookbook I had received, very kindly, as a gift. The whole pan-Arab Mediterranean Israeli cooking thing has become extremely popular in the wake of the Ottolenghi boom, and I receive and read a lot of those cookbooks. I commented that this book in particular, a sort of Middle Eastern Iranian Ottoman mish-mash, had some lovely looking recipes, but that I felt by lumping all of the Levant, North Africa, Turkey, the Gulf and Persia together,  something really got lost in the middle. It probably helped that I thought the book badly needed a copy editor, as there were numerous seemingly strange observations in the book. (My favorite of which, the statement that "potatoes aren't very common in Middle Eastern dishes," made me laugh out loud for its bizarreness. These are the same people who invented the french fry sandwich, but I digress.)

This is not meant to be a criticism of any one cook or cookbook, and I should add that I have tried a few recipes from this cookbook that came out wonderfully. Part of my criticism comes from a frustration that the approach to the Middle Eastern cooking trend is all about cherry-picking. Everyone talks about harissa, preserved lemons, za'atar, dukkah, and labne. No one talks about jameed, ashta, qawarma, malawach, or home-made couscous. Those are all great ingredients, wonderful things, but each one comes from a unique tradition and a different style of cooking.  And yes I know, some things will always be more popular than others. But, would you call something an Asian dish just because it involved a bit of soy sauce?

Of course, I don't expect anyone to be as nerdily excited as me in studying Middle Eastern food traditions, nor should they be. But, I do think there is the responsibility on the part of the cookbook writers who write about these foods, and their editors, to dig a little deeper. I expect more than just some pretty pictures and four sentences about sour cherries. Maybe I'm asking too much.  Maybe 90% of your readers just want to look at the pictures, but what about the 10% who bought your book because they actually wanted to learn something. It takes a lot for someone to buy a real hard-copy cookbook these days, and I want the author to make it worth my while.

The thing is, it's sad if people only know about harissa sold in jars. If someone has gone far enough to buy your book about Middle Eastern foods, then they deserve to learn about hand-rolled barley flour couscous and cooking with argan oil and salty creamy ijben cheese (all those are Moroccan, but you get my drift). I think you should explain to them that good labne and good preserved lemons, one from North Africa and one from the Levant, would not historically have found their way into the same dish. Innovate with knowledge of tradition.

There is a lot of pressure on cookbook writers, Instagrammers,  bloggers, chefs, to produce food that is PRETTY. The NYTimes Pete Wells has talked about that here, and I loved Tim's recent thoughts about the boringness of pretty things here. I don't want food to only be pretty, I want it to taste good and if it's a really good meal or a good cookbook, it should be food that makes me think. My recent meal at Lokanta Yeni in Istanbul was an example of that, modern food rooted in Turkish tradition, with a carrot dip that made you rethink everything you knew about carrots. If you're a chef that's using the traditional spice blend dukkah on your menu, but that's the only thing you know about Egyptian food, then I think there's something wrong with that. Maybe that makes me obnoxious, or a snob, or maybe just someone with really high standards. I'm okay with that.

I read an interview with Anissa Helou recently, where she was asked if anyone was doing really truly innovative modern Middle Eastern cuisine, and she answered honestly, no she could not think of anyone. There are plenty of Middle Eastern influences in restaurant food these days, especially with some well-known chefs, but I'm inclined to agree with her opinion. Because there is very little understanding of the depth and history of these food traditions, there cannot be real innovation. Your food cannot make someone think if you do not know what you are saying, and if you do not know how the ingredients you are using are traditionally used, then how do you know what you are saying with them? I think often of a profile of the Italian chef Massimo Bottura that ran in the New Yorker last year.

However, all is not lost when it comes to this (endlessly long rant by yours truly). Greg Malouf's books always ring true to me, as someone who has traveled and researched the food he writes about, but takes the flavors in a new direction. (His salmon samkeh harra recipe is a classic example of this.) Leila's Haddad's wonderful Gaza Kitchen book, that introduced the world to roast baby watermelon fetteh, is another example. I love reading Joumana's Taste of Beirut, which highlights both traditional and contemporary Lebanese foods, and I'm looking forward to Felicia Campbell's Taste of Oman coming out this year.

This is all just a long winded way of saying that all these articles, these books that arrive in my mail box, the food I eat in restaurants, have gotten me thinking about demanding higher standards for myself, and for this blog. I write this unpopular food blog out of love and joy and occasionally out of frustration and a sense of duty to my six readers. But mainly, I write it to keep track of things I've liked and things I've learned. I work full time, commute battling donkey carts in the streets, spend an inordinate amount of time scrubbing vegetables, and don't have time to photograph perfectly styled shots of what I cook in my late night dimly lit kitchen. I routinely search twitter to find out if the explosion I just heard was an IED, a transformer exploding, or fireworks (all are regular occurrences). In between all that, I hope that I can write something meaningful for a few people in this tiny corner of the internet.

back soon with something tasty.....
photo 2
Photos from Wadi Degla, Cairo, Egypt.

15 February 2015

The Laziest Breakfast

photo 2
My mother always said February was the worst month. Certainly the dreariest and bleakest, weather wise, and with a holiday most people profess to hate. In Cairo, a dense cloud of pollution hangs above the city, and last week a dust storm left our houses and lungs coated with a dense layer of yellow dust. It is a month to burrow indoors and start spring seedlings, to dream of spring gardens, to make soups and bake breads and start long books.

I have been doing a lot of at least one of those things, cooking that is, but my results have been about as dreary as this month usually is. First, there was Daniel Boulud's stuffed pumpkin, a massive affair of pumpkin and cheese and bread and cream, mushrooms and bacon, all baked inside a pumpkin. We had people over, and while it was festive, something about the recipe fell flat to me. It's never a good sign when no one wants to eat the leftovers.

Then there was a stuffed cabbage (malfouf mahshi) which was fine, but I packed the rolls a bit too tightly and we pretended it was still okay by smothering them in yogurt. There was the terrible mistake of trying to make Alice Medrich's kamut poundcake with half coconut oil for the butter, which needless to say turned out miserably. I redeemed myself a bit with a riff on my usual soba noodles, topping them with a gingery stir-fry of edamame and cucumber ribbons alongside thinly sliced rare flank steak.

It shouldn't surprise you then that the best thing I made in weeks was something that took no more than five minutes to put together and was devoured nearly as quickly. It is possibly the laziest breakfast I can think of making, but surprisingly delicious. Someone recently told me that their mom used to beat eggs in the concave side of pita bread, then slide them into the oven to bake. It's totally a simple mom-on-the-run trick (no messy bowls! protein!) that kids remember fondly, and obviously I had to try it. I made ours using local baladi bread, which is a fluffier sort of pita, and topped the eggs with chunks of local soft creamy feta cheese and chili flakes. It may just be the best discovery of February.

photo 1

The Laziest Breakfast
  • pita bread -- I think a slightly puffy variety is best, although it doesn't really matter as long as it has a concave side
  • eggs, 1 per bread
  • salt
  • toppings such as feta cheese, chili flakes, herbs, avocado, etc.
1. Preheat oven with the broiler on high. Place pita bread, concave side up, on a baking sheet. Break 1 egg into each pita and swirl around with a fork. Sprinkle cheese, salt, and chili flakes over bread.
2. Slide the breads into the oven. Watch the breads closely, until the eggs are just set and the cheese is melty, but be careful the edges of the bread don't get too brown. It should only take a few minutes. Transfer to a serving plate, cut into wedges, serve warm.

26 January 2015

Syrian Stuffed Onions

photo 1-8
Well then. 2015! What does 2015 have in store for you? Last year, we came into the year knowing roughly how the year was going to play out. I started 2014 knowing that we'd be moving several times, and we did, a total of four times, which is why I dubbed it the Year of the Nomad. I also knew that we'd most likely be buying our first home, which we did (!), and which I couldn't be more than thrilled with. We went from Algiers to Chicago to Cairo, and just last week all of our possessions finally caught up with us in Cairo. You can see a few of them up there, in that picture that is cropped so that it does not picture the mountain of boxes and tissue paper behind me.

So 2014 kind of played out roughly how we expected, but 2015? I really don't know. We'll continue to settle in here in Cairo, hopefully squeeze in some fun vacations (ever since I read this piece I am dying to go to Crete). I have a new pile of cookbooks, as well as my old favorites, that I'd like to keep working my way through. Which brings me to todays recipe for stuffed onions, Syrian style.

I have been wanting to make these stuffed onions, which consist of a meat filling rolled inside onion skins and braised in a tomato-y sauce, for years (years!), but I was always intimidated by separating the onion layers. Somehow in my mind this dish seemed more difficult than the other stuffed dishes, like stuffed zucchini or eggplant. And, I know what you're thinking, you're thinking if SHE thinks this dish is complicated then there's no way I'm going to make it!

But hear me out here folks. These stuffed onions are actually surprisingly easy to make! Really, separating the onions is really easy, they basically fall apart on their own, and stuffing them with the meat mixture is super simple. It takes no more time than making meatballs, and is certainly easier than coring zucchini. You simmer the stuffed onions in a tomato and molasses-y mixture for a longtime, until the onions are as sweet and supple as caramelized onions. Caramelized onions stuffed with a flavorsome meat mixture is my idea of a good dinner. Despite my paltry kitchen photo below, the end result looks far more impressive than the amount of effort put into it. It's a good start to a what I hope is a good year!
photo-2
Syrian Stuffed Onions
This is one of those classic dishes that's all about making something luxurious with very little. The stew cooks for a very longtime, a total of nearly 2 hours, which really draws out the best caramel-y flavor of the onions. Serves 2-4, you could easily double this for more people.

for the stuffing:
olive oil
1 shallot, diced
6 cloves garlic, sliced
1 tablespoon tomato paste
1/2 teaspoon cinnamon
1 teaspoon cumin
1 teaspoon salt
1/2 cup golden raisins
3 tablespoons water
1 handful parsley, chopped
1/2 lb ground beef
2 tablespoons rice

for the stew:
7 very large shallots or 5 small onions
1 tablespoon tomato paste
2 tablespoons carob molasses or date or regular molasses
1 teaspoon lemon juice
1 cup boiling water
1 tomato (optional)

1. Make the filling: Heat some olive oil in a wide deep skillet. When hot, add the shallot and stir over medium heat until starting to become translucent. Add in the garlic, cinnamon, cumin, and the tomato paste and stir to combine. Let cook another minute or so. Add in the salt, water, and golden raisins and stir everything together to combine. Let cook for a minute, stir in the parsley, and then pour the mixture into a mixing bowl. Set aside the skillet
2. Add the ground beef and rice to the mixing bowl, and stir the filling mixture together to combine. (Use a metal spoon to mix, or knead together with your hands.)
3. Prep the onions: Meanwhile, heat a large pot of water to boiling. Remove the ends of the shallot or onions and peel off the papery skins. Cut a slit lengthwise through the onion only to the middle. Plunge the onions in the boiling water and let cook for 7-12 minutes, or until the onions are soft enough to be pliable. Drain the onions and set aside to cool.
4. Prep the pan: When cool enough to handle, separate the onion layers. Take the very center bits of the onion, with the smallest layers, and use those to line the bottom of your skillet. If using the tomato, use the slices to line the skillet over top the onion bits.
5. Stuff: Place a tablespoon of filling on one of the onion layers and roll up tightly. If desired, roll the stuffed onion in another onion layer. (I like two onion layers best, but sometimes you have to do one if you start to run low on onions.) Depending on the size of the onions, and the amount of onion/filling I have left, I roll the filling in anywhere from 1 to 3 layers of onion skins. Lay the stuffed onions in the prepared pan on their sides. Continue until you've used up all filling or onions, whichever comes first.
6. Cook: Preheat the oven to 350F. Dot the tomato paste in between the onion rolls. Drizzle the molasses over top the onions. Pour the lemon juice and the boiling water over top. Sprinkle the whole thing with salt. Bring the pan to a simmer on the stove, then cover and simmer for 30 minutes. Transfer the pan to the oven and cook for 1 hour, covered. Uncover the pan and cook for another 20-30 minutes, or until the sauce around the onions is reduced and caramelized. Serve warm with rice.

17 January 2015

A Narrow Place Can Contain a Thousand Friends

On Eating Syrian Food in Istanbul
photo 1-7
I have never been to Istanbul in the summer. The first time I went was right after my husband and I were engaged, deep in November when cold air and clouds blew over the Bosphorus. It rained nearly every day but we didn't care, happily lost in the Bazaar, waiting in line to tour the mosques with a scarf tied closely over my head. The cisterns beckoned with their steamy underground warmth. On that trip I dragged my now-husband along to find a famous roast chicken at a local Syrian restaurant, three hours tromping around in the cold and rain, all of which was quickly forgotten over a menu written in Arabic script and a flamingly delicious chicken.

On my most recent trip I am back again, this time in the cold first week of January. I am in town for vacation, having worked over the Christmas and New Year's holidays, and I have always loved taking vacations when everyone else is going back to work. Tourists are fewer, shopkeepers are more relaxed, more willing to chat and more generous with bargaining.  The presence of Syrian restaurants in Istanbul has a new meaning, providing sustenance and warmth to those who have made it out of the war-torn country. It is a topic of discussion all over the city, the rising rents, the begging on the street.
photo 2-9
We walk and walk and walk until our toes and fingers are unbearably cold, the air crisp and heavy like it gets right before it's going to snow. Up and down Istiklal, the main pedestrian drag, I hear Syrian Arabic everywhere, those long stretched out vowels, the slightly nasal intonation. We look at ikat fabrics in the bazaar, I buy gloves at a leather shop to help my frozen fingers, we eat steaming spicy kebaps and sticky chicken pudding bundled in our coats.

My husband has developed a taste for salep, a steaming milky drink thickened with powdered orchid root that is popular all over the Eastern Mediterranean. Steamed milk has always had a disturbingly putrid sour smell to me, but I indulge him in repeated coffee shop stops, ordering apple tea and fiddling with our phones. One afternoon, a small Syrian boy comes in to the tea shop where we sit, hand out stretched, and the owners generously empty their tip jar into his small hand. A Turkish customer nearby grumbles angrily, the shop suddenly turning quiet. I watch the boy go back to his two friends waiting outside and their faces light up, shrieking at their new found wealth, none of them could be older than seven or eight.

Ten minutes later the smallest boy comes back to the shop, marching up to the counter and speaking excitedly in a mix of broken Turkish and Arabic. He is showing off the new wool hat he has bought with their tip money, strutting about, pulling the hat up and down to cover his ears. The young men at the counter are exceedingly kind, ruffling his hair, trying to joke with him despite the language barrier. I ask the little boy what his name is and he points at himself in surprise, then says 'Abd-al-Salam, from Aleppo. As we talk I notice how small his waist is, I tell him it's going to snow tomorrow and he should stay inside. When we leave, I put a large bill in the tip jar.
photo 2-8
That night, over Turkish wines and cheese at Sensus we talk about the problems of refugees, about aid distribution and displaced persons policies, about the logistic problems of how to get the right things to the right people. It is starting to snow and I wonder if 'Abd-al-Salam has gloves. I feel silly for being such a sad sap, and remind myself of all the places that I've been and worked that were full of poverty and refugees and malnutrition. But Syria, of course, is different. As my husband says, paraphrasing a quote we once heard about New York, "you lived in Syria and never really got over it."

The next morning we wake up to a beautiful blanket of snow over the city. We abandon plans to go the Asian side to see a copper pot showroom, and instead take refuge inside the Pera Museum where we are the only visitors to see an exhibit on Polish Orientalist paintings, the sounds of wind whipping harshly around the buildings. Over the next few days we walk in the snow, shop, attempt to see a movie that ends up being in Turkish, and eat delicious meals at Mikla and Yeni Lokanta.
photo 4-4
On our final morning I tell my husband, who luckily travels on his stomach, that we're going to a Syrian place I've heard about and we tromp through the freezing snow. The corner shop is clearly marketing their chicken and schwarma, but it is early and I see that they have fetteh on the menu, both with fetteh with olive oil and fetteh with clarified butter, which is a good sign that these guys know what they're doing. I order a large bowl and we take a seat in the corner.

The restaurant is immaculately clean and several young Syrian men stand behind the counter alternately prepping things for the day and snapping pictures of the snow on their phones and talking about the virtues of Instagram vs Twitter vs WhatsApp. I learn that they are all from different parts of Damascus, which I chide them is evident from their menu, and we talk about Damascus's neighborhoods, about the felafel stand in Muhajireen and the best way to make hummus musabaha. One of the young men shows me a picture of my old neighborhood from that morning, its cars covered in a foot of snow from the freak storm that's covering the region. Like every conversation I have with Syrians, there is that lull in the conversation that happens right after you've talked about the old days, the pause where you are both remembering what has happened since.

The fetteh, a steaming bowl of hot chickpeas, yogurt, tahini, and fried bread, is the best I've had in years. It reminds me of the difficulty of recipe writing, those simple dishes like my mother's Thanksgiving stuffing that hinge delicately on technique and proportion. Several other Syrian men also come in and sit down to bowls of fetteh and hummus and tea, but of course that's not really what this restaurant is about. They show me proudly the copies of Souriatna, an independent newspaper, and it's clear that the restaurant doubles as a place where like-minded Syrians can meet and organize. When we leave, the cashier seems confused when I insist on giving him an extra large tip. Somehow the concept of Western liberal guilt doesn't translate well, but I go back out into the snow happy and encouraged to see people working to make the best of their situation. And well, that fetteh was really good.
photo 3-5

Recipes: Fetteh (plain) and Fatteh (with Eggplant)
See Also: Small Projects Istanbul

02 January 2015

Currently

conducting key research.....
photo 1-5
photo 2-6
back with stories and adventures soon, until then, I hope you had a lovely holiday and wish you all the best in 2015!